
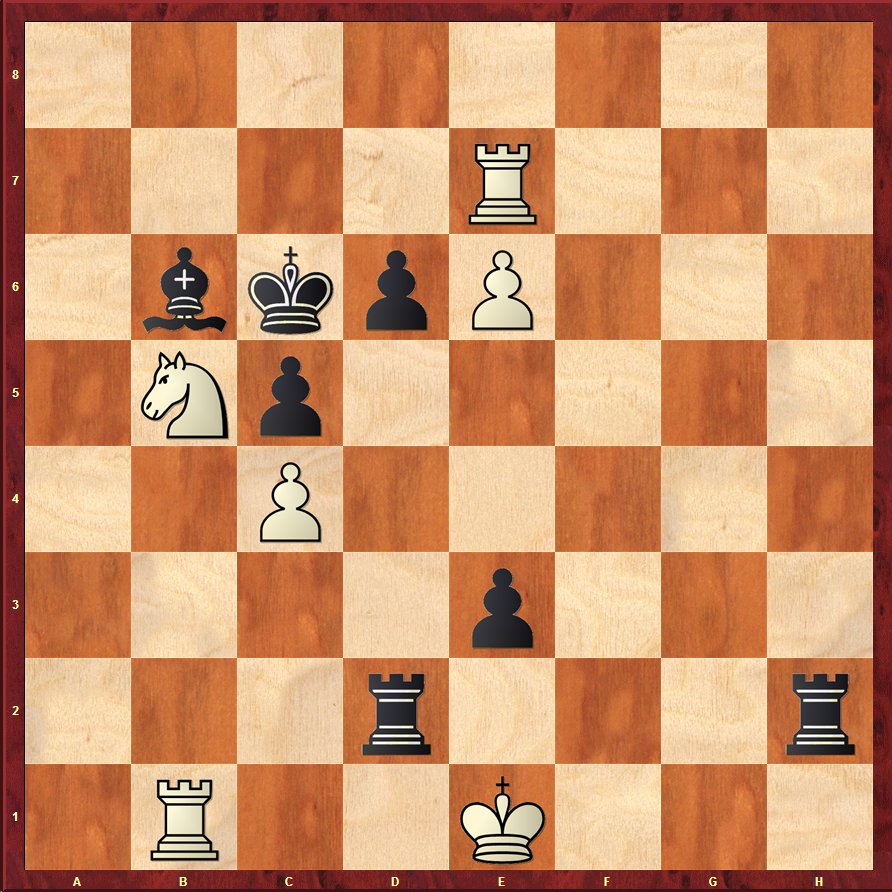
White to move. How can White save this position?
8/4R3/1bkpP3/1Np5/2P5/4p3/3r3r/1R2K3 w – – 0 1
Stamma, 1792
Chess Daily News from Susan Polgar
White to move. How can White save this position?
8/4R3/1bkpP3/1Np5/2P5/4p3/3r3r/1R2K3 w – – 0 1
Stamma, 1792
| M | T | W | T | F | S | S |
|---|---|---|---|---|---|---|
| 1 | 2 | 3 | 4 | 5 | ||
| 6 | 7 | 8 | 9 | 10 | 11 | 12 |
| 13 | 14 | 15 | 16 | 17 | 18 | 19 |
| 20 | 21 | 22 | 23 | 24 | 25 | 26 |
| 27 | 28 | 29 | 30 | 31 | ||
I would hardly call finding a mate in two “getting out of trouble. Obviously, only checks matter since Black is threatening mate on the move. Fortunately, one of the 3 available checks leads to a forced mate on the next move.
1. Rc7+ B:c7 (only move, blocking the king’s remaining flight square) 2. Na7#
…. Rc7 +
Bxc7 Na7++
1. Rc8+ Bxc8 2. Na7#
Rc7 Check Bc7
Na7 Checkmate
A mate in 2 can usually save you.
The best defense is an offense — or, in this case, a simple mate in two. Rc7+ forces BxC7, after which Na7 is mate.
1) Rc7+ forces Bxc7, after which
2) Na7 is mate.
1.Rc7 BXc7 2.Na7#
Took about a minute to find the winning solution.
Black is threatening mate on h1 so something drastic is needed. The key point is that the black king is in a mating net and white can take advantage of this with a forced mate in 2.
1.Rc7+ Bxc7
2.Na7# and all of the white pieces are working in harmony along with the 3 black pieces around the king to finish off the imprisoned black king.
What was much harder to spot was why white’s only defensive move Rf7 does not work.
(I could not find a mate here)
1.Rf7 Rh1+
2.Rf1 Rxf1+
3.Kxf1 e2+
4.Kf2 Bd8(4.Ke1 Ba5) and the bishop can move to a5 or h4 depending on white’s move and black should be up a rook and winning easily. I do feel however that there is a much better line than this however I was unable to find it.
This is an easy one…
White Elephant gives a check from c7 and only move is Black Camel takes Elephant. After that White Horse gives check from a7 and Black King has no refuge.
Easier way to find solutions to such problems is to look for ‘redundant squares’, meaning – The squares that are checked by more than one power, so one can utilize the forces to full potential by occupying more squares that are checked by your forces.
Rationing of forces in similar ways was a strategy pioneered in India by King Ajatshatru (400 BCE).
Patrick
1.Rc7+!!.Bxc7 forced
2.Na7#!!
Harry
The best way to get out of trouble is to mate your opponent:
1.Rc7+ Bxc7
2.Na7 mate
1. Rc7+ Bxc7 2. Na7#
1.Re7-c7+..Bb7×c7
2.kb5-a7+ & mate
Why FEN notation?Neither board nor pen and paper are required.Not even HTML tags for me.Only coffin for black king.
1.Rc7+ Bxc7
2.Na7 and and and black king breathes his last.
1. Rf7
looks good since it stops the immediate threat Rh1#.
I notice that black has no bishop moves because of Na7#.
One anonymous reader wondered why the simple defensive 1) Rf7 at least “save the day” (obviously the two move mate is superior). I may have found out why.
1)Rf7 Rh1+
2)Rf1 Ba5!? with the idea if
3)Rxh1 Rh2+
A.4)Kf1 Rxh1+ Now taking back the Rook and skewering the other Rook
B.4) Kd1 e2+
5) Kc2 e1=Q+ I haven’t worked this all out but I think Black’s winning easily here
White isn’t forced on move 3 to take the R with Rxh1; he has checks for example. But at least there’s a clear idea here with …Ba5!? and may show why the mate with Rc7+ is imperative just to save the game.
– Craigaroo
by the way one other amusing line after
1)Rf7? Rh1+
2)Rf1 Ba5 is
3)Ra1 … with the idea to capture the B on a discovered check. But
3)… Ra2+ thwarts that. White’s K will have to move to d1 with or without a useless interposition by the Knight, giving up protection to the R on f1 and allowing …Rxf1 mate.
Again, White has checks he can try on move 3 so I haven’t worked this all out. But this seems like the dangerous line if White misses the mate in two and plays the simple defensive 1)Rf7
-Craigaroo
oh I messed up in one line:
after 2)… Ba5, 3)Rxh1 Rh2+, 4)Kd1 e2+, 5)Kc2 e1=Q the Rook that’s checking is simply hanging. So I’m unsure of the answer here though Black can try e1=N double-check followed by …Rxh1 which seems to leave Black a piece up.
– Craigaroo