
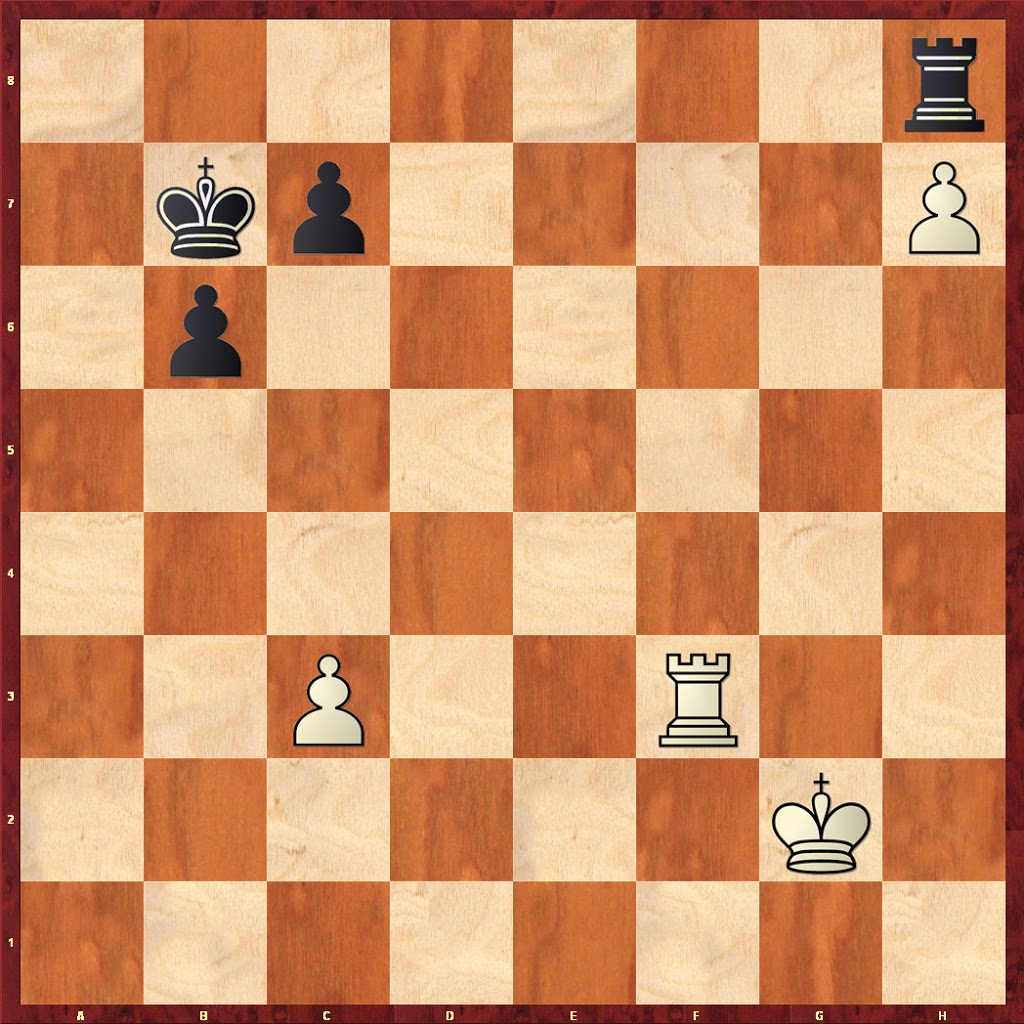
White to move. Is this a win or draw for White? What’s the plan for White? How should White proceed?
7r/1kp4P/1p6/8/8/2P2R2/6K1/8 w – – 0 1
This was an actual game earlier today at the Russian Women’s Championship (Bodnaruk vs. Kosteniuk).

Chess Daily News from Susan Polgar
I could see two possible strategies to win, if I were playing white-play the rook to h3, and attack the black rook at h8 with the king, or play the rook to f7, and do the same thing. I would naturally favor the first of these as it ties the black rook to h8 permanently, and gives the white rook scope of action along the h-file from h6 to h1 to combine with the remaining white c-pawn to hold up any counter play on that side of the board that black might try to generate. Let’s look at both of these to see what the issues might be:
1. Rh3
Here, black can either advance pawns, advance the king, or use the king to try to defend his rook- white’s plan is for the king to boogie up the board to g7. Continuing:
1. …..b5
2. Kg3 c5
3. Kg4 Kb6
4. Kg5 b4
5. c4
Not really sure at the moment, but this looks better to me than cb4 as it retains the pawn and forces the black king to a4 to support the passed b-pawn’s advance. Continuing:
5. …..Ka5 (in for a penny…)
6. Kg6 Ka4
7. Kg7 Rh7 (forced, now)
And, now, I don’t think it matters how white takes at h7- this is looking either drawn or a loss for white:
8. Kh7 b3 (only move)
And white has a choice- either get the rook behind the b-pawn at b6, cover either the first or second rank with the rook and bring the king back in time to protect his pawn or win black’s pawn, or start bringing the king to the queen side immediately. All in all, I think they are all likely draws by simple move counting:
9. Rh6 Kb4(b2 10.Rb6 Ka3 11.Kg6+-)
The point of black’s ninth move is to keep a threat on white’s remaining pawn- 9. ….b2 loses as white’s king makes it in time to win at c5 after the exchange at b1. White must now be careful- the “obvious” Rh4 protecting c4 is an immediate losing move:
10.Rh4? b2!
11.Rh1
Here, Rb6 loses to c8(Q) with check! Continuing:
11. ….Kc4 and white cannot stop both pawns with the rook alone as his king is too far away to aid in the defense. At move 10 in this line, I think white must start bringing the king back to the queen side of the board:
10.Kg6 b2
11.Kg5
Here, Kf5 loses again to the queen with check:
11. ….Kc4 (best I think)
12.Rb6 Kc3
13.Kf4 c4 (Kc2 will draw, too)
14.Ke4 Kc2
15.Kd4 c3
16.Kc4 Kd2 (what else to try?)
17.Kd4 c2
18.Rb2 Kd1
19.Rc2 Kc2=
The question, now, is did it make a difference at move 8 when white took the rook with the king? I don’t think so, but I will continue the analysis in my next comment due to length.
White should play 1. Rh3 to tie black’s R. to a8, then move the R to h5 to restrict the black K. If black runs the K to g6 then in the meantime the White K will reach black’s pawns. If black then takes the white Rook pawn, then after the exchange of rooks white’s K will eat the two black Q side pawns and Queen his own c pawn.
If black tries to keep his K guarding the Queen side pawns the white K will move over to g7 and win the black Rook. The two black pawns by themselves can produce no more than a single passed pawn, easily caught by the white rook.
There are lots of variations but the above plan wins fairly straightforwardly.
In my previous comment, I had started the analysis on the following plan to protect the h-pawn and bring the king forward to attack the rook at h8:
1. Rh3 b5
2. Kg3 c5
3. Kg4 Kb6
4. Kg5 b4
5. c4 Ka5 (in for a penny…)
6. Kg6 Ka4
7. Kg7 Rh7 (forced, now)
Here, I had analyzed the line in which white retakes at h7 with his king, and I hope I had shown that black got just enough counter play to force a draw- a draw that white only gets only by bringing the king back to the queen side in the nick of time. The other option in this line was to take with the rook at h7. This could potentially be different in that the white king might be one move closer to the queen side (especially, c5) than in the previous line, but by my count of moves, this is compensated for by the fact that the rook is one move out of a more optimal defensive stance:
8. Rh7 b3 (Kb3 9.Rh4 Kc3 10.Kf6=)
9. Kf6 Kb4(b2?? 10.Rb7 Ka3 11.Ke5)
10.Rh4
This move lost in the previous line because white’s king was too far away to aid. Without Rh4, black will get an easy draw after taking at c4, so this is the only move with any chance to win, but it is also a draw:
10. ….b2
11.Rh1
Here, Rh7 and Rh8 also draw, I am fairly confident in saying, after black takes at c4. Continuing:
11. ….Kc4
12.Ke5 and, in light of my previous comment, I don’t think we need to study this line any further- clearly black can force the exchange at b1, but cannot protect the c-pawn from white’s king at the same time.
Is there a place in the line above where white might have tossed away a win? The latest move that was a candidate for being a bad move for white was back at his 7th move. Once the white king reached g6 on move 6, the white rook was no longer needed to protect h7, so, white might have tried Rh5 attacking c5 instead of Kg7 attacking the rook and, thus, giving black time to eventually win c4. Let’s look at this alternative:
7. Rh5
And, now, black has moves like b3, Kb3, Rc8, and Rb8 (getting behind his own b-pawn (I think, forcing white to do the exchange at h8. Taking these in order:
7. …..b3
8. Rc5 Rb8 (Kb4 9.Rc7 b2 10.Rb7)
9. Rb5! Rb5 (else, Rb7 follows)
10.h8(Q)Rb6 (b2 11.Qa8 Kb3 12.Qe4)
11.Kf5 b2
12.Qa8 Kb3 (Kb4 much the same)
13.Qh1 Kc4 (what else?)
14.Qb1 Rb3
And, I have to admit, I am not sure, at all, how to win this. Unfortunately, I am out of time since I have an appointment, this afternoon, I cannot put off. If there are no solutions posted by the time I return, I will continue this.
Hi Susan,
Here is a link you might be interested to post in your blog.
http://timesofindia.indiatimes.com/city/ahmedabad/Gujarat-set-to-revolutionise-chess-Vishwanathan-Anand/articleshow/6957904.cms
Thanks
Rh3 then move king to g7 and play Rh4 to cut off blacks king
It is hard to tell. I’d play 1. Rf7 and then get the king down there.
Ok, I got desperate and went to the Nalimov table base. The position reached at the end of my second comment, after white’s 10th move, h8(Q) is a known draw, but that wasn’t a real surprise since I simply could find no way to win as white, I just needed to confirm it.
I still believe 1.Rh3 is the right first move, but I don’t think white can actually bring the king to g6 and/or g7 and win the game. I am going to look at the variations where white brings the king immediately over to the queen side, but first I want to look at 1.Rf7:
1. Rf7 b5
2. Kf3 Kb6
3. Ke4 c5
4. Kf5 b4
5. c4 b3 (best or not?)
6. Kg6
Now, we have a position sort of like the positions I discussed previously, but with the black king less advanced down the board. Black has three basic options here, Ka5, Rb8, and b2:
6. …..b2
7. Rf1 Ka5 (to clear way for Rb8)
8. Rb1
I will discuss Kg7 below. Continuing:
8. …..Kb4 (Rh7 might also be ok)
9. Rb2 Kc4
10.Kg7 Rh7
11.Kh7 Kd4
And, I see no reason to continue this, simple counting shows white’s king is too far away to aid the rook, and white will have to give up the rook to keep the remaining pawn from queening.
I really don’t see how white could play this line differently and win the game. Now, back to 1.Rh3:
1. Rh3 b5
2. Kf3 c5
3. Ke4 b4
4. c4
I still think it best to keep the pawn. I am trying to use the king and the rook on the h-file to either liquidate the queen side and get back to support the h-pawn, or to win the two black pawns. If I give up the c-pawn, the white king will end up on b3 or b2 and the black king will make a beeline for the h-pawn. Continuing:
4. …..Kb6 (or Ka6)
5. Rh6 Ka5 (alternatives below)
6. Kd3
And, now, I got the sort of position I was looking for- a kind of zugzwang- black has three moves- Ka4, b3, and Rd8+:
6. …..Ka4
7. Kc2! b3 (Ka3 8.Ra6#; Ka5 8.Kb3!)
8. Kc3 Ka5 (only move)
9. Kb3 Rb8 (only move)
And, here, white wins nicely with Kc2!
10.Kc2 Re8 (Rh8 11.Kc3!+-)
11.h8(Q)Rh8
12.Rh8 with a won endgame for white. I will pick this line up in my next comment.
Must be a rook move. I like Rh3 better than Rf7 because with the move 1.Rh3 the black rook is now forced to stay on h8. My idea is that if Rf7 the black rook can eventually move more freely on the 8th rank to give checks. So, 1.Rh3 is my choice. Next step is to activate the white King.
It depends what Black decide to do, either trying to capture the h-pawn or to push to the Queenside, but whatever he does io think Black is lost.
In my previous comment I analyzed the following line in which white protects the h-pawn from h3 and brings the king to the queen side:
1. Rh3 b5
2. Kf3 c5
3. Ke4 b4
4. c4 Kb6 (or Ka6)
5. Rh6 Ka5 (alternatives below)
6. Kd3 Ka4
7. Kc2! b3 (Ka3 8.Ra6#; Ka5 8.Kb3!)
8. Kc3 Ka5 (only move)
9. Kb3 Rb8 (only move)
And, here, white wins nicely with Kc2!
10.Kc2 Re8 (Rh8 11.Kc3!+-)
11.h8(Q)Rh8
12.Rh8 with a won endgame for white.
Here, the first major deviation in this line, working backwards is at black’s fifth move in which he got his king trapped on the a-file and white used this to mount mating attacks that eventually led to the loss of the b-pawn and the rook. So, at move 5, black must move the king backwards instead of forward:
5. …..Kc7
Now, the question is on white-what to do? With black’s king cut off from the pawns, my very first thought would be to initiate, at last, the advance of the king to g6:
6. Kf5 b3 (anything else, now?)
7. Kg6 b2
8. Rh1
So, what can black do here? I see Ra8, threatening Ra1 and Rb8, threatening b1(Q), and Kd6/c6:
8. …..Rb8
9. Rb1 Kc6 (in case of 10.Kg7)
10.Rb2 Rb2 (what else now?)
11.h8(Q)Rg2
12.Kf5, and this should be won for white with the extra pawn on the board. At move 10, it does black no good to try to keep white from queening with his 10th move:
10. ….Rd8 (or Ra8/e8)
11.Rh2 Kb6 (Rd6 12.Kf7 Rd8 13.h8Q)
12.h8(Q)Rh8
13.Rh8, and white will hold his pawn and win the game. At move 8 above, I still think black loses with the alternatives:
8. …..Ra8
9. Rb1 Kd6 (if white plays 10.Kg7)
10.Rb2 with the same basic ending as above. Or
8. …..Kd6
9. Kg7 Rc8 (everything is similar)
10.h8(Q)Rh8
11.Kh8 Ke5 (going for the pawn)
12.Rd1! b1(Q) (Ke4 below)
13.Rb1 Kd4
14.Rc1 and when black tries to play his king to d2, the white rook will skeddadle over to h1 and reprotect his pawn from h4 and the white king will come into play after that giving a won ending. Also, at move 12, black can do no better with
12. ….Ke4
13.Kg7 Ke3
14.Kf6 Ke2
15.Rb1 Kd3
16.Rb2 Kc4
17.Ke5 Kc3
18.Rf2 Kd3 (or Kb3,doesn’t matter)
19.Kd5 c4
20.Rf3 Ke2
21.Rc3 and the pawn falls.
There are probably a lot of loose ends in this analysis in the first 5 moves, but I am exhausted and hungry.
I will be very curious to see if there is a more direct solution to this problem. In any case, I am going to take a look at the actual game now and see how it played out over the board.
This is a difficult ending.
Note that the game would be a draw if the c-pawns were removed. The extra White and Black pawns will slow Black down enough to allow White to win,as Black will have to spend moves to get a passed pawn.
1 Rh3
The Rook has two ways to protect the h-pawn: the given move or f7. On the h-file, the Rook is able to cut off the Black King’s access to various ranks and eventually put Black in Zugzwang in some variations.
1 …. b5
If Black sits and does nothing (i.e. if the King moves back and forth between b2 and a3), White will advance his King up to g7 trade the h-pawn for Black’s Rook, and get back in time to stop Black from promoting a pawn.
With the given move, Black tries to advance her pawns so that when the Rook is sacrificed, the pawns and King will be far enough along to stop White’s King from returning in time.
2 Kf3
White keeps her options open: advancing to g7 or attacking Black’s pawns.
2… Kb6
3 Rh5
Cutting off Black’s access to c5.
3 … Ka5
If 3… c4, 4 Ke4 Ka5 (if Black plays b4 at any point, White’s reply is c4, after which Black’s pawns fall), 5 Kd3 c4+ (5… Ka6/b6, 6 Rh6+ cuts Black off one way or the other), 6 Ke3 Ka4, 7 Kc2 (never mind what the engines say; this is more direct) Ka4 , 8 Kb2 b4 (otherwise, Black must allow White’s King to get to b4 and win both pawns), 9 Kc2! (Not 9 cxb4? Kxb4 with a draw) b3+ (9 …bxc3, 10 Kxc3, and now Black must move the Rook), 10 Kb2, and Black must move the Rook away.
4 Ke4
White keeps all options open.
And now Black has two lines:
4 …. Kb6
5 Kf5 aKc5
6 Rh4! c6
7 Kg6 Kd5
8 Kg7 Ra8
9 h8=Q Rxh8
10 Kxh8
Or 10 Rd4+ first, but it serves no useful purpose, as the tempo gained against the King will be lost later by c4.
10… c5
11 Kg7 c4
12 Kf6
White’s King will make it back in time to stop Black.
LINE TWO:
4…. Ka4
5 Kd5 Kb3!
Black sets a little trap for White.
6 Kc5!
6 Kc6? is a mistake after …Kxc3, 7 Kxb5 (7 Kxc6 b4 with an easy draw) Kd3, 8 Kc6 Ke3, 9 Kxc7 Kf3, 10 Kd6 Kg4, 11 Rh1 Kf5! (Not 11 … Kg5?, 12 Ke6 Kg6, 13 Rg1+, and wins as in the main line) 12 Ke7 Kg6, 13 Rg1+ Kf5!, 14 Rg7 (14 Ra1 Kg6) Ra8, and White can make no progress.
6… Kxc3
Stalling by 6 … Kc2 won’t help (unless White gets silly and plays 7 Kc6, as above), as White plays 7
7 Rh3.
7 Rh3+
The point of 6 Kc4.
7… Kd2
8 Kxb5 Ke2
9 Kc6 Kf2
10 Kxc7 Kg2
11 Rh6 Kf3
12 Kd6 Kf4
Note that if it were Black’s move here, she could draw by 12… Kf5, as in the previous long variation. White’s Kc3 and Rxh3+ cost Black one tempo: the difference between winning and drawing.
13 Ke6
An obvious move… and the only move that wins. If White clowns around with a move such as 13 Rh1?, then … Kf5! puts us in the same position as the above note to White’s 6th .
13… Kg4
14 Rh1 Kg6
Reaching another position in the note to White’s 6th move: one that wins for White.
15 Rg1+ Kh5
If 15 … Kxh7, 16 Kf7 wins the Rook or mates. 15… Kh6, 16 Kf7 Rxh7+ (16… Ra8, 17 h8=Q+ Rxh8 Rh1+ wins the Rook), 17 Kf6 wins the Rook or mates.
16 Kf6 Ra8
Black takes one more shot. White wins the Rook after 16… Rxh7, 17 Rh1+
17 Rg8
Of course, 17 h8=Q also wins after 17… Rxh8, 18 Rh1+.
17… Ra3+
Black sets a trap. If White plays 18 Kg7?, Black escapes with 18… Ra7+, 19 Kh8 (else the Pawn is lost) Kh6.
18 Kf5! Ra5+
19 Ke4
White moves down the diagonal towards b1 and runs Black out of checks.