
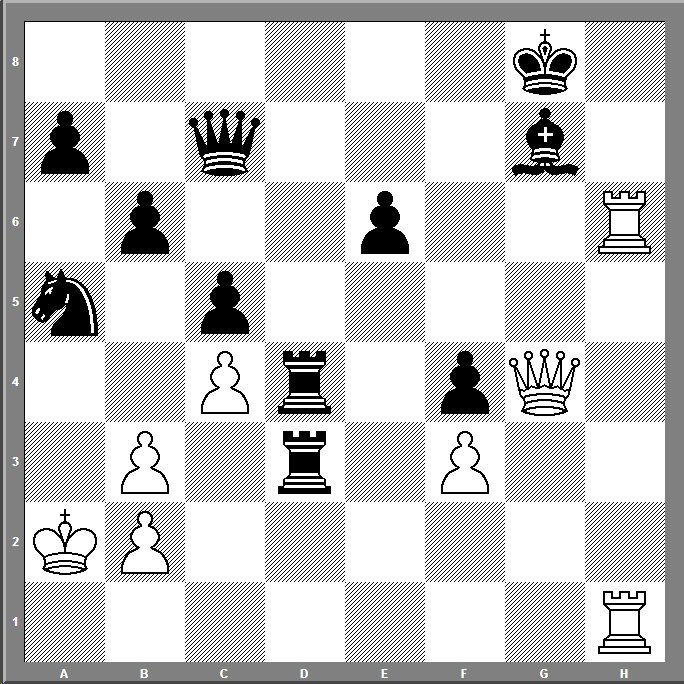
White to move. What is the best continuation for White?
6k1/p1q3b1/1p2p2R/n1p5/2Pr1pQ1/1P1r1P2/KP6/7R w – – 0 0
Chess Daily News from Susan Polgar
White to move. What is the best continuation for White?
6k1/p1q3b1/1p2p2R/n1p5/2Pr1pQ1/1P1r1P2/KP6/7R w – – 0 0
| M | T | W | T | F | S | S |
|---|---|---|---|---|---|---|
| 1 | 2 | 3 | 4 | 5 | ||
| 6 | 7 | 8 | 9 | 10 | 11 | 12 |
| 13 | 14 | 15 | 16 | 17 | 18 | 19 |
| 20 | 21 | 22 | 23 | 24 | 25 | 26 |
| 27 | 28 | 29 | 30 | 31 | ||
1.Qg6 Kf8
2.Rh8 Bxh8
3.Rxh8 Ke7
4.Re8 Kd7
5.Qxe6 mat
1.Qg6!!.Kf8 forced, otherwise Rh8#
2.Rh8+!.Ke7.
3.Re8+..Kd6/7.
4.Qxe6#
If
>A-2..Bxh8.3.Rxh8+.Ke7.4.Re8+.Kd6/7. 5.Qxe6#
Harry
Forced mate in five:
1. Qg6! Kf8
Anything else:
2. Rh8#
2. Rh8+ Bxh8
2. … Ke7
3. Re8+ Kd7/d6
4. Qxe6#
3. Rxh8+ Ke7
4. Re8+ Kd7/d6
5. Qxe6#
1.Qg6 Kf8
2.Rh8+ Bxh8
3.Rxh8+ Ke7
4.Re8+ Kd6
5.Qxe6#
A key consideration in this position is the safety of White’s king.
Nice job by the readers who found the winning line 1) Qg6 Kf8 (forced), 2) Rh8+ sac’ing the Rook. This is a deceptive position even though Qg6 is a logical enough try since it cuts off the flight square f7 and threatens mate on the move with Rh8. It’s deceptive because even though the immediate threat is clear enough the (forced) reply …Kf8 at first glance seems adequate and in fact seems to defeat the point. Black still has flight squares and now with Black having unpinned his Bishop, White has to sac a Rook to get to h8. Whereas if White simply played 1) Rh8+ in the first place, doesn’t White get to h8 “for free”?
In fact I was initially tempted by 1) Rh8+ Kf7, 2) R1h7 and only after some errors in analysis felt I should look for something better, with Qg6 the next candidate because of the mate threat. However the ultimate point of it wasn’t immediately clear to me and I was somewhat surprised to find it led to mate. I knew that it would create a possibility of an additional check by either Rook or Queen on the back rank but I did not immediately appreciate the ultimate target was the pawn and square e6. Only following a vague general rule 1) to examine every check and 2) to examine checks from behind the King (that is, from the back rank) led me to find the mate. It doesn’t give me confidence in my ability to find the right line in innumerable other positions 🙁
From the standpoint of someone trying to improve their chess, the key position looking 3 or 4 moves ahead then follows the Rook recapture and check:
1. Qg6 Kf8
2. Rh8+ Bxh8
3. Rxh8+ Ke7 Easy to see how you get here. And easy enough to find the mate if you commit to looking at this even if you miss the solution right away. The hard part for me is to unerringly see the solution when it’s 3 to 4 moves ahead. I’m more likely to see the weaker next move 4) Rh7+ because the skewer is a familiar pattern.
4. Re8+ Kd6
5. Qxe6 mate All as others correctly pointed out. The mating attack benefits also from the placement of Black pieces on c5 and c7, hemming in their own King, and perhaps that’s harder to foresee 5 or 6 moves out.
As mentioned, I made numerous errors while analyzing the alternative 1) Rh8+ Kf7, 2) R1h7 In case anyone’s wondering what’s wrong with that line, Black’s best reply is probably 2)… Qe5 re-establishing defensive communication between the Queen and the Bishop. – Craigaroo