
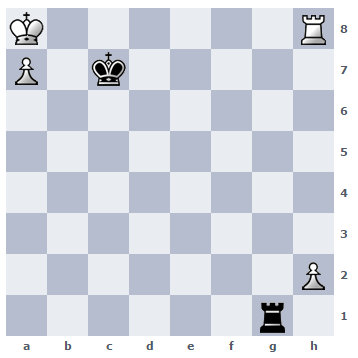
White to move. Is this a win or draw for white? How should white proceed?
K6R/P1k5/8/8/8/8/7P/6r1 w – – 0 1
White to move. Is this a win or draw for white? How should white proceed?
| M | T | W | T | F | S | S |
|---|---|---|---|---|---|---|
| 1 | 2 | 3 | 4 | 5 | ||
| 6 | 7 | 8 | 9 | 10 | 11 | 12 |
| 13 | 14 | 15 | 16 | 17 | 18 | 19 |
| 20 | 21 | 22 | 23 | 24 | 25 | 26 |
| 27 | 28 | 29 | 30 | 31 | ||
1. h4 (it’s the only move to win) Rg7
2. Rb8 Rg6
3. Rb7 Kc6
4. Rb1 Rh6
5. Rc1+ Kb6
6. Kb8 Rh8+
7. Rc8 Ka6
8. Rxh8
Your line is first computer line. Why you posted what? There are many alternatives. And why h3 doesn’t work? This is tough puzzle and great to analyze.
Because I think it’s the strongest play for black. With h3 you lose tempo
Alena, you may be on the right track but only part of the way.
1. h4. Rg7. 2. Rb8. Kc6! Will bust white plan. ( 3. Rc8+. Kb6. Now Not 4. Kb8??. Rb7+. 5. Ka8. Rxa7+. 6. Kb8. Rb7+ a perpetual check and draw) 3. Rb1. Rg8+. 4. Rb8. Rg7. 5. h5. Rh7! Draws.
Even in your original upto move 3. If 4. Rb1. Rg8+. Forces 5. Rb8. When Rg6. Maintains status quo and white cannot make headway.
I am in the process of preparing a thorough analysis of the problem that should explain the role of the tempo of h4 vs h3, but 2. …Kc6 in this line doesn’t bust white’s plan here, though your line with 3.Rc8 will only draw with best play. White proceeds with pushing the pawn at move 3:
1. h4! Rg7
2. Rb8! Kc6
3. h5!
All of white’s move are the only winning ones to this point. Your instincts are correct- white will sacrifice one of the pawns to queen the other, but it will be the a-pawn that queens in almost all the lines, and 2.Rb8 prevents black from playing Kb6 at critical moments. So, after 3.h5 what are black’s options now? Let’s take a cursory look at them:
3. ………….Rh7
4. h6!
Another only move. This should make black’s predicament clear. With the arrangement on the queenside, white is always threatening a line that puts the white rook on a square like g8 and then playing Kb8 to queen the a-pawn. At the moment this doesn’t work because black can always check from b7 forcing the white king back into the hole on a8. So, after 4.h6, black’s king can’t return to c7 without allowing Rb7+ skewering the black men. If black takes at h6, white checks from c8 and then plays Kb8 and the white king will eventually escape the checks of the rook from b6, c6, and d6 by walking over to e7. There are two plausible looking plans for black here- 4. …Rf7 (or variation), and 4. …Kc5:
4. …………..Rf7
5. Rg8
Not the only winning move, but the most direct. White’s plan here isn’t obvious- for all the world, it looks like white the white king can’t escape a8, but this is overlooking something:
5. …………..Rh7 (Kb6, 6.Rg6 anyway)
6. Rg6 Kc5 (of course, Kc7 allows 7.Rg7+- that pawn on h6! allows that)
7. Kb8 Rh8 (what else?)
8. Kb7 Rh7 (again, what else is better?)
9. Rg7 and white wins.
Or, at move 4 for black:
4. …………..Kc5
5. Rg8 Rh6 (in light of the above, what else is better?)
6. Kb8 Rb6
7. Kc7 Rc6
8. Kd7 Rd6
9. Ke7 and black is out of safe checks.
One might now have a suspicion of why it was critical to get that h-pawn moving the max amount at move 1- the above is just one of the reasons. I hope to make it clear when I finish with the analysis later today.
The key I think is to sac the a pawn to keep Black busy on the queenside while the WK marches to support the h pawn which should be advanced enough.So here goes the solution:-
1. h4. Rg7
2. h5..Kb6
3. h6..Rxa7+
4. Kb8..Rb7+
5. Kc8..Rc7+
6. Kd8..Ra7
7. Rf8..Rh7
8. Rf6+..Kc5
9. Ke8..Kd5
10. Kf8…Ke5
11. Ra6..Kf5
12. Kg8
There is a tricky maneuver involved in following line:-
h4
Rg7
2. h5..Kb6
3. h6
Rxa7+
4. Kb8..Rb7+
5. Kc8..Ra7
6. Re8..Ra8+
7. Kd7..Ra7+
8. Kd8! (Not Ke6?? For Rh7 and it is a draw!) Ra8+.
9. Ke7. Ra7+.
10. Kf6 and supports h pawn in time.
The first line, black has erred at move 7. ….Rh7. Black draws with either Kc6 or Kc5- it is critical that the black king not lose too much time getting at to the kingside:
1. h4 Rg7
2. h5 Kb6
3. h6 Rxa7+
4. Kb8 Rb7+
5. Kc8 Rc7+
6. Kd8 Ra7
7. Rf8 Kc6! (or Kc5)
8. Rf6 Kd5! (an only move, now)
9. Ke8 Ke5! (another only move)
10.Rf7 Ra8 (Ra6 should draw now, too- classic rook ending)
11.Ke7 Rh8 (draws with Rb8, Rc8 and Ra6)
12.h7 Ra8 (or Rb8, and Rc8 draw)
And I think one should see that white can make no progress here with the black king on e5- white would love to get his king on the other side of his rook, but this isn’t possible with the black rook on the 8th rank and the black king e5- if white plays the rook back to f8, black just checks from a7 and wins the last pawn.
In this line, is drawn after white’s second move.
A truly interesting ending. There are several great questions to ask yourself, though I think moving the h-pawn is actually pretty obvious, but I think the best way to discuss this, as I have found more often than not, is to discuss some of the moves that fail to win- especially 1.Rh7+ and 1.h3. Let’s start with 1.Rh7, which is a move a lot players will try, and a lot players as black would blunder with their first move:
1. Rh7? Kc8??
Both moves are “obvious” from a purely superficial level- white is trying to free his king with the check, and black might think keeping the white king on a8 is necessary- neither belief is true. Let’s continue with the line to show how white wins when black has returned the mistake:
2. h4!
There are probably several winning moves here, including 2.Rh8 which returns to what is essentially starting position, but 2.h4 is surely the shortest route and 2.h3 should also win now one move slower. White’s plan should be obvious, right? He is going to advance the h-pawn all the way up the board, is going to play Rh8+ at some point, then play h7 and then check with the rook from the 8th rank freeing the h8 square. Black’s only defense of this plan is now to put the rook behind the h-pawn at some point to prevent that h8(Q) move since he can only check the white king after moving his own king to d8- easily won by white. I am not going to analyze all the side variations here, just show you the most direct win:
2. ………….Rf1
3. h5 Rg1
4. h6 Rh1 (the most resistant line now)
5. Rh8 Kd7 (if Kc7, white plays h7 still)
6. h7
So, white has set the table for dinner. Black has put the rook behind the h-pawn to prevent Rd8+ followed by h8(Q)+, but the arrangement of the black king on the seventh rank with the advanced enemy pawn should be familiar to a lot of players- the black king can’t leave the seventh rank without allowing that check from the 8th rank, but the other threat can’t be met either……
7. …………..Ke7
8. Rb8
And white wins- the twin threats of 9.h8(Q) and 9.Rb7+ can’t be parried with 8. ….Rxh7 without losing the rook outright.
Now, black can draw after 1.Rh7 by playing either 1. …Kc6, or 1. …Kb6, and I will return to those moves later if I have the time. Right now, I just want to show why 1.h3 fails to win- it is important to understand:
1. h3? Rg7!
This is the only draw for black:
2. h4
I will return to white’s second move in this line later (you can anticipate this by studying Alena’s line above where white played 2.Rb8). I will leave all side variations after 2.h4 for the curious, but you should be able to find the draws for black regardless of how white plays this line now. Continuing:
2. …………..Kb6!
Another only move. Black is attacking the major weak point in white’s position, a7, forcing white to react. Note the features- white’s rook is still tied to the 8th rank unless he checks the black king due to the mate threat. Let’s look at white’s options one by one, but I consider this first one most enlightening one:
3. Rb8 Ka6! (keeps the pressure on white- the white rook must be moved)
4. Rc8
If white moves the rook down the b-file, black just checks from g8 and then returns the rook to g7 to repeat the position.
4. ……………Ra7 (Kb6 should also draw since the essential elements are no different from move 2)
5. Kb8 Rh7 (lots of draws here, now)
6. Rc4 Kb6 (lots of draws)
Of course, black is threatening Rxh4 if the white rook leaves the 4th rank without a check, and is threatening Rh8# if the white rook leaves the c-file without a check. And the pawn can’t move now- if black’s king reaches the pawn first, the draw is a given, so white must race the king, but this is hopeless:
7. Kc8 Kb5 (again, lots of draws, this is the most obvious line to me)
8. Rg4 Kc6
9. Rd4 Kc5 (again attacking the rook and driving it off the file)
And it should be clear that this is drawn. So, lets return to the position after black’s second move- it is K6R/P5r1/1k6/8/7P/8/8/8 w, and we will discuss white’s other options for his 3rd move:
3. Kb8
A tricky move for the unwary- I have actually fallen for this trick before in a somewhat similar position- when the pawn can’t be taken with check, as above, it is immune since 3. ….Rxa7 allows 4.Rh6+ losing the rook on a7. In fact, in this position, there is only one drawing move, but it is an obvious one……
3. ………….Rb7!
This gives white the unappetizing choices of 4.Ka8 allowing 4. ….Rxa7 with check, or 4.Kc8 allowing also 4. …Rxa7 which forces either 5.Kb8 to prevent Ra8+, or 5.Rh6+ which simply allows the black king to reach the kingside in time to stop the last white pawn. The details are left as an exercise.
So, at move 3, white could also try pushing the pawn another square. Again, from this position:
K6R/P5r1/1k6/8/7P/8/8/8 w
3. h5 Ra7
4. Kb8 Rg7 (lots of draws, I just pick this one because it looks the worst for black)
5. h6 Rf7
6. h7
So, white has advanced the pawn, but has no check with the rook, and can’t skewer along the 7th rank either. All white can do here is try to get his king out from in front the black king by returning to a8, but….
6. …………Ra7 puts white in a bind- he now loses his pawn just to save the rook.
At this point, I am going to break up the comment so that I can more deeply explain the difference between 1.h4! and 1.h3?.
So, let’s now discuss the winning line and its most critical variations:
1. h4! Rg7
The most resistant defense is the same line as the 1.h3 line above- it involves the exact same threats, but the white pawn being one move further advanced changes things in a subtle manner…….
2. Rb8!
Prevents black from double attacking a7 with Kb6, and threatens 3.Rb7+ preventing black from playing Rh7. The best black can do here is to retreat the rook to the sixth rank:
2. ……………Rg6 (see my comment to K.V. for a discussion of Kc6)
3. Rb7 Kc6
4. Rb1
Or Rb2/3/4 is ok, and Rb8 also wins, but regresses in moves. Why this move, or its variants? The easiest way to explain this is to see what happens if white plays the other optional move at move 4- for example:
4. h5?
Of course, the white can’t play the rook along the 7th rank or Kb8 without allowing Rg8+ or #. Continuing:
4. ………..Rh6!
The only move that draws. Black keeps the threats on the 8th rank open, blocks the pawn and white is now forced to play the rook down the b-file, but with the h-pawn under attack and immobile, this plan no longer works…..
5. Rb1 Rh5!
6. Rc1 Kb6!
And black won’t let the white king off of a8- ever. White can return the rook the 8th rank to prevent the check and or mate, but……
7. Rc8 Rh7 (or Ra5 draws)
8. Kb8 Ra7
If white tries 8.Rf8 and then 9.Kb8, black gets to take at a7 with check. It should be obvious this is drawn. So, lets return to the main line where white has played 4.Rb1- the following position: K7/P1k5/6r1/8/7P/8/8/1R6 b with black to move:
4. ……………Rg8
This is the most resistant option for black. Alena shows 4. …Rh6 above, but with Rg8, black makes white work for the win quite a bit harder:
5. Rb8 Rg7
This position arose in my reply to K.V. above, so we already know it is won for white after 6.h5….
6. h5!
You can see black has a problem, right? If black attacks the h-pawn with Rg5, white pushes the pawn to h6 forcing the black rook to h5, then just puts his own rook on g8 opening the b8 square for the white king and a8(Q) can’t be prevented. So, black must try to put the rook on h7, but this also fails because the same threats, and repeated for clarity:
6. …………..Rh7
7. h6 Kc5 (Rh6 8.Rc8! and 9.Kb8 and a8Q can’t be prevented; Kc5 clears the sixth rank)
8. Rg8 Rh6 (forced)
9. Kb8 Rb6
10.Kc7 Rc6
11.Kd7 Rd6
12.Ke7 and black is out of safe checks- the pawn will queen costing black his rook at a minimum.
So, all that is left for us to do is to demonstrate this line above, but with 1.h3 and we can see the difference that one square makes:
1. h3 Rg7
2. Rb8 Rg6 (Rg5 should also be a draw- every other move should lose)
3. Rb7 Kc6
4. Rb1 Rg7!
Lets again review the fundamentals of this position- the white rook can’t the b-file other than to check from c1 because of the threat of Rg8+, and the white king can’t play to b8 without allowing Rg8#- this leaves only 5.Rb2/3/4/8, 5.Rc1+ and 5.h4 as moves for white. Lets discuss them all:
5. Rc1 Kb6!
Double attacking the a7 pawn again, and we already know that white can’t concede this pawn without conceding a chance to win. The only thing to try is to try the check from b1 again…
6. Rb1 Kc6 to repeat the position. So white must try something different at move 5 (or 6):
5. Rb2 Rh7 (or Rf7, e7 or d7 should be ok)
6. Rb3 Rh8 (or Rg7, f7, e7, d7)
7. Rb8 Rh3=
Or, at move 5….
5. h4 Rh7! (the only move)
Black again has the suite of threats on the white king and now on the h-pawn. White must either concede repetitive moves, get mated, lose his rook, or concede the h-pawn, or in some variations, concede a-pawn. But I want to show one last variation from this point…..
6. Rb8 Rh4!
The only move to draw. So, what can white want to do here? He would like to get the rook along the 8th rank off of b8 and put the king b8 so that the pawn can be queened, so……..
7. Rc8 Kd7!
This prevents 8.Kb8 and 8.Kb7 because of the reply of Rb4+, but here comes the critical point about white’s very first move in this line….
8. Kb7 Rb4!
9. Ka6 Ra4!
Black cannot play 9. …Kxc8 due to a8(Q) with check. Ask yourself what would have been different in this line had white played 1.h4 instead of 1.h3? The difference would have been in move 6- black would have captured the pawn on the 5th rank instead of the 4th rank, and after 9.Ka6, the white rook would have been under immediate attack and would not have had the ability to safely check from the a-file. That tempo at the start is subtle, and not easy to understand
That last sentence should have read
“after 9.Ka6, the black rook would have been under immediate attack and would not have had the ability to safely check from the a-file. That tempo at the start is subtle, and not easy to understand.”