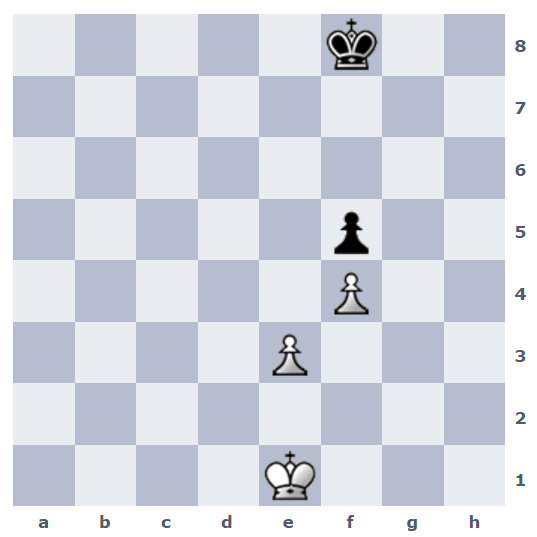
WK must get to e5/e6, because once he’s there, Black is lost. Black can’t prevent this since White can use threats of entering d4/d5 to gain the opposition.
Karthic, it is hard to follow your solution, since in 9 moves you make 4 illegal moves,
all those … Kf6 4. Ke5; …Kf6 7. Ke6; … 8…. Kg6 9. Kf6, etc. and K jumping from c6 to 5… Ke6;
please write slower and more legible
Smart theorizing is cool but this is a position where concrete move-by-move
solution is needed. White seems to be winning but by a very precise line.
1. Kd2 Ke7 2. Kd3 Kd7! full opposition for Black and a dead draw 3. Kc4 Kc6 4. Kd4 Kd6 =
The main winning line seems to be 1. Kd2 Ke7 2. Kc3! Kd7 3. Kd3!! (the only move!!
all others draw: 3. Kd4 Kd6; 3. Kc4 Kc6; 3. Kb4 Kd6)
catching the opposition for White and winning eg:
3… Kc6 4. Kc4 Kd6 5. Kd4 Ke6 5. Kc5! and getting to e5 and winning the pawn.
White needs to take the opposition when Black moves to the d-file. For example. 1.Kd2 Ke7 2.Kc3 Kd7 3.Kd3 Ke7 4.Kc4 Kd6 5.Kd4 now White has the close opposition on the d-file and will win Black’s pawn. The rest is easy.
A very good question to ask oneself is this- why is the beginning of Philosopher55’s line a win for white after white’s third move, but in the puzzle from Saturday the same long range opposition was a draw for black? There is one big difference- what was it?
I suppose a simple answer might be the obvious that the difference is whose move it is. I think it might be possible to say something theoretical here rather than just indicate variations, but it’s not clear to me ‘the opposition’ is a useful enough concept since one needs not only to work out one can get it, but also work out one can keep it, and pawns might be controlling squares one needs to keep it. Nevertheless, the opposition is a practical thing to bear in mind when working out how to proceed.
What I was thinking was who was on the move with respect to the opposition! That in the first position (of the three like positions recently), if it were Black’s move (as it is), he can take the opposition and draw, or if it were White’s move, he could win. And in the third (of the three like positions again, and after the developments up to the third move you give), if it were Black to move (as it is), he has to give up the opposition and White can win, whereas White to move means that Black, having the opposition, can draw. Fair enough, I didn’t adequately say what I had in my mind!
Here’s related considerations of the relevance of relative squares. There’s more to these things than just ‘the opposition’, as I was saying last email.
No, in each case the player on the move faced the opposition (long distance) and was the player with only one pawn- black in one case, white the other. However, the player with the two pawns could only draw the position while the other could win. What was the difference? Assuming I made no mistakes in doing this for once (creating the FENs), here are the two positions I am talking about- the first derived from this puzzle, and the second from the other- the first is won by white with black to move, the second is drawn with white to move, but in each case the player moving was the one with only one pawn
I’m with you now, we were talking about different positions!
Your question IS a good one.
It can certainly be shown by giving variations.
I would find a more general theoretical explanation interesting, if one really is available.
Of course, the differences between the positions are that the pawns are nearer the side in one (but that doesn’t seem to matter here) and that the kings are each one square further up the board in one, and that seems to be the crucial point. Then, the two pawns are more vulnerable in one of the positions, where the opposing king can more readily get to the square directly in front of the back pawn if the other king tries to outflank, leaving it too far away to defend. Though, that square is not one to otherwise go for since the other king can stay close enough to retreat, defending it, and then force the intruding king back to win.
Hurrah! I reckon it shows also that ‘the opposition’ isn’t everything, and that my comment above ‘the pawn on f4 takes away the square e5’ is right on!

 000
000
Kd2, maintaining rectangular opposition, wins. White outflanks Black and promotes.
WK must get to e5/e6, because once he’s there, Black is lost. Black can’t prevent this since White can use threats of entering d4/d5 to gain the opposition.
eg:
1 Kd2 Ke7 2. Kd3 Ke6 3. Kc4 (not Kd4 Kd6) Kd6 ( … Kf6 4. Ke5 wins) 4. Kd4 Kc6 5. Kc5 Ke6 6. Kc6 Ke7 ( .. Kf6 7. Ke6) 7. Kd5 Kf6 (now forced, or white plays Ke5) 8. Ke6 Kg6 9. Kf6 wins
Karthic, it is hard to follow your solution, since in 9 moves you make 4 illegal moves,
all those … Kf6 4. Ke5; …Kf6 7. Ke6; … 8…. Kg6 9. Kf6, etc. and K jumping from c6 to 5… Ke6;
please write slower and more legible
After, say, 1 Kd2 Ke7
I think Black draws by keeping an odd number of approach squares between the kings (opposition)
So, after 2. Kd3 Black draws by Kd7
and similarly on the other side of the board
On further reflection, White can go 2. Kc3, and Black cannot keep up the odd squares strategy because the pawn on f4 takes away the square e5.
Smart theorizing is cool but this is a position where concrete move-by-move
solution is needed. White seems to be winning but by a very precise line.
1. Kd2 Ke7 2. Kd3 Kd7! full opposition for Black and a dead draw 3. Kc4 Kc6 4. Kd4 Kd6 =
The main winning line seems to be 1. Kd2 Ke7 2. Kc3! Kd7 3. Kd3!! (the only move!!
all others draw: 3. Kd4 Kd6; 3. Kc4 Kc6; 3. Kb4 Kd6)
catching the opposition for White and winning eg:
3… Kc6 4. Kc4 Kd6 5. Kd4 Ke6 5. Kc5! and getting to e5 and winning the pawn.
Did I miss something this time?
1. Kd2 Ke7 2. Kc3! Kd7 3. Kd3!! Kc6 4. Kc4 Kd6 5. Kd4 Ke6 5. Kc5! and getting to e5 and winning the pawn.
Did I miss something this time?
Only that the reason here White wins is that the pawn on f4 takes away the square e5 from Black!
Well…. I actually did not miss this because it’s so obvious but one can add it indeed
to add clarity to the logic of calculation here. Good job.
Sorry, it was a joke!
White needs to take the opposition when Black moves to the d-file. For example. 1.Kd2 Ke7 2.Kc3 Kd7 3.Kd3 Ke7 4.Kc4 Kd6 5.Kd4 now White has the close opposition on the d-file and will win Black’s pawn. The rest is easy.
A very good question to ask oneself is this- why is the beginning of Philosopher55’s line a win for white after white’s third move, but in the puzzle from Saturday the same long range opposition was a draw for black? There is one big difference- what was it?
I suppose a simple answer might be the obvious that the difference is whose move it is. I think it might be possible to say something theoretical here rather than just indicate variations, but it’s not clear to me ‘the opposition’ is a useful enough concept since one needs not only to work out one can get it, but also work out one can keep it, and pawns might be controlling squares one needs to keep it. Nevertheless, the opposition is a practical thing to bear in mind when working out how to proceed.
No, the player on the move, is the same.
What I was thinking was who was on the move with respect to the opposition! That in the first position (of the three like positions recently), if it were Black’s move (as it is), he can take the opposition and draw, or if it were White’s move, he could win. And in the third (of the three like positions again, and after the developments up to the third move you give), if it were Black to move (as it is), he has to give up the opposition and White can win, whereas White to move means that Black, having the opposition, can draw. Fair enough, I didn’t adequately say what I had in my mind!
Here’s related considerations of the relevance of relative squares. There’s more to these things than just ‘the opposition’, as I was saying last email.
http://chessconfessions.blogspot.co.uk/2007/05/king-and-pawn-endgamesconfused-as-usual.html
https://en.wikipedia.org/wiki/Corresponding_squares, in which also see the ‘See also’.
No, in each case the player on the move faced the opposition (long distance) and was the player with only one pawn- black in one case, white the other. However, the player with the two pawns could only draw the position while the other could win. What was the difference? Assuming I made no mistakes in doing this for once (creating the FENs), here are the two positions I am talking about- the first derived from this puzzle, and the second from the other- the first is won by white with black to move, the second is drawn with white to move, but in each case the player moving was the one with only one pawn
8/3k4/8/5p2/5P2/3KP3/8/8 b – – 0 1
8/3k4/5p2/6p1/6P1/3K4/8/8 w – – 0 1
I’m with you now, we were talking about different positions!
Your question IS a good one.
It can certainly be shown by giving variations.
I would find a more general theoretical explanation interesting, if one really is available.
Of course, the differences between the positions are that the pawns are nearer the side in one (but that doesn’t seem to matter here) and that the kings are each one square further up the board in one, and that seems to be the crucial point. Then, the two pawns are more vulnerable in one of the positions, where the opposing king can more readily get to the square directly in front of the back pawn if the other king tries to outflank, leaving it too far away to defend. Though, that square is not one to otherwise go for since the other king can stay close enough to retreat, defending it, and then force the intruding king back to win.
That was the difference- the position of the kings in relation to the pawns.
Hurrah! I reckon it shows also that ‘the opposition’ isn’t everything, and that my comment above ‘the pawn on f4 takes away the square e5’ is right on!