
White to move and draw. No computer please!
Hint: It is not as easy as you think 🙂
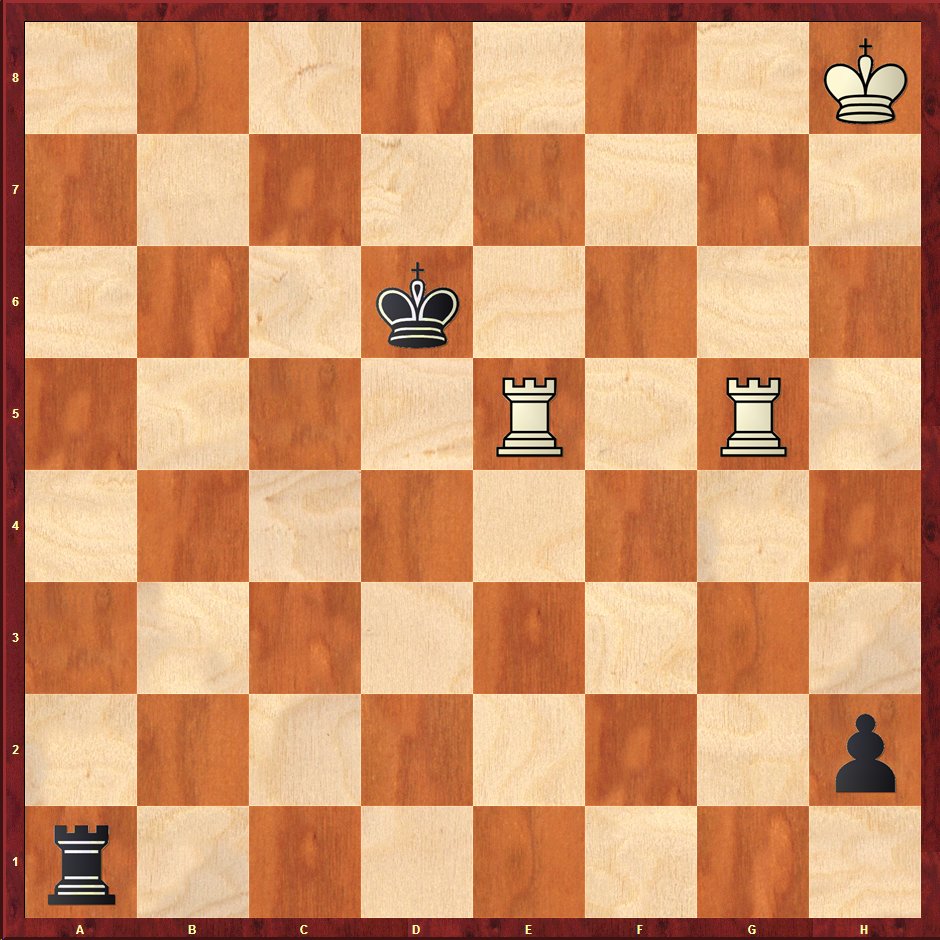
7K/8/3k4/4R1R1/8/8/7p/r7 w – – 0 0
Chess Daily News from Susan Polgar
White to move and draw. No computer please!
Hint: It is not as easy as you think 🙂
7K/8/3k4/4R1R1/8/8/7p/r7 w – – 0 0
| M | T | W | T | F | S | S |
|---|---|---|---|---|---|---|
| 1 | 2 | 3 | 4 | 5 | ||
| 6 | 7 | 8 | 9 | 10 | 11 | 12 |
| 13 | 14 | 15 | 16 | 17 | 18 | 19 |
| 20 | 21 | 22 | 23 | 24 | 25 | 26 |
| 27 | 28 | 29 | 30 | 31 | ||
Well, the beginning isn’t hard to find- literally has to be Rd5+. And you can walk through this stepwise. It is very instructive rook ending, and it is a puzzle I have seen more than once over the years:
1. Rd5
So, to solve this, you have to ask what it is exactly white needs to do to be able draw. He needs to be able to put a rook behind the pawn and to either not have the other rook under attack by the black king, or he must have already moved his king off of the h-file so that the recapture at h1 isn’t with check. So, on move 1, the black king needs to keep contact with the rook by playing to either e6 or c6- if black plays Kc7 or Ke7, white puts the rook on h5 with an easy draw:
1. …..Kc6
If black plays the king to e6, white has draw by repetition by leaving the rook on d5 and checking endlessly from e5, f5, g5, and h5 with the other rook. Black must try to find shelter on the a-file:
2. Rc5
As with the first move, white must check here from c5- there is time for nothing else. Continuing:
2. …..Kb6
As with move 1, black must keep moving towards the a-file, otherwise white obtains an easy draw by repetition by leaving the rook on c5 permanently and checking with the other rook. Continuing:
3. Rb5 Ka6
As before, a move to the 7th rank allows an immediate Rh5 with an easy draw. So, what can we say about this position? White has achieved none of his goals- his king is still on the h-file that will result in a check from h1 when the rooks are exchanged there, and the attack on the b5 rook is still operative. White has two options- check from a5 or play Rh5. I can see already that 4.Ra5 is going to lose, but it isn’t quite as simple as it might appear since white will have 5.Rg6+ to get the rook safely behind the h-pawn, but it won’t matter:
4. Ra5?? Ra5
5. Rg6 Kb5! (the only winner)
6. Rh6
Here, Rg5 buys nothing but a shorter loss since the king will just play to b4, and white will be forced to check from g4 and then put the rook behind the pawn at h4. Continuing:
6. ……Ra2
I think black can still win with Ra8+, but he will still have to protect the pawn with Ra2 eventually, so it is likely just a longer win to check. So, now, black has his pawn protected from the side, and his king is now primed to come in to support the h-pawn. It will do white no good to try to cut the king off- 7.Rh4 is met by Rg2 keeping the white king trapped on the h-file for the rest of the play while black marches the king over to first attack the rook, then to march down to support the pawn. The point is that the white king can never venture to h5 since black will play Rg8 to skewer the king and rook. At move 7, white does best to get the king off the h-file and as far down the board as possible:
7. Kg7 Kc4 (heading to support)
8. Rh4
White makes things easier by playing 8.Kg6/f6 since black can then check from a6, exchange rooks at h6 and then queen the pawn. Continuing:
8. …..Kd3
9. Rh3 Ke4 (Not K second rank!!!)
10.Kf6
Here, 10.Kg6 is only different by being shorter loss, I think, since the king on the g-file just provides a shield for a move after white puts the rook back to the 8th rank for long-distance checks, and white will have to waste a move to get the king off the g-file anyway. Continuing:
10. ….Kf4
11.Ke6
There is nothing to be done here- black will just force the rook away from the 3rd rank regardless of what white does now:
11. ….Kg4
12.Rh8 Kg3
13.Rg8 Kf2
14.Rh8 Kg1 and black will block the check from g8 with Rg2.
In my next comment, I will pick up white’s defense at move 4 above.
In my first comment, I covered the following line:
1. Rd5 Kc6
2. Rc5 Kb6
3. Rb5 Ka6
And I showed that white loses with 4.Ra5+ following the exchange at a5 followed by the black king beating the white king to control f5/g5. This leaves only one other plausible defensive move:
4. Rh5!
It only appears that black can win with 4. ….h1Q. There is a big difference in the present position that isn’t true in the previous positions where the black king was on d6/c6/b6:
4. …..h1(Q)
5. Rbg5!
By checking from d5/c5/b5, white has pushed the black king far enough away that white can now start threatening his own mating net by checking from g6, then h7 etc. With the queen under attack, black must move it, but to where? Black can check from a8, but after 6.Rg8, black again has to move the queen. The g6 square will become very important here due stalemate themes. Let’s run through the options:
5. …..Qa8
6. Rg8! Qc6 (try to stop Rg6/h6)
7. Rg6!!Qg6 (nothing wins now)
8. Ra5
And black can’t take the rook without stalemating white on h8. His only real hope is to try to find protection by the queen, but white need only be careful to check from a square the black queen can capture while relieving the trap on the white king, or block a check. This isn’t hard to do:
8. …..Kb7 (Kb6 9.Ra6+ skewers)
9. Ra7!
Black wins if white checks from b5 since black blocks with the queen. White need only keep on the king like a glove:
9. …..Kc8
10.Rc7 Kd8
11.Rd7 Ke8
12.Re7 Kf8
13.Rf7! and the queen can capture, of course, but the stalemate is still in force.
So, we can dispense with moves like 5.Qe4 and 5.Qc6 in the line above since white still plays 6.Rg6 check, and black will have to give up the queen to stop the mate, or will have to stalemate white eventually by taking a rook at g6. I don’t think I have left any loose ends here.
Well, White either has to come down to a rook versus rook ending, or in lieu of that manuever into a stalemate.
He has to avoid coming down to a rook versus rook ending where he is being checked by Black’s rook and his own rook is under attack by the Black king.
It is possible to accomplish this.
1. Rd5+ Kc6 2. Rc5+ Kb6 3. Rb5+ Ka6 4. Rh5 h1=Q 5. Rg5!
Not 5. Ra5+? when 5 Kb6 6. Rb5+ Kc6 7. Rc5+ Kd6 wins for Black.
But after 5. Ra5+? Black must avoid returning the favor:
5. .. Rxa5? 6. Rxh1
After 5. Rg5 however, White can force a draw.
5. .. Qc6 6. Rg6 Qxg6 7. Ra5+ Kb7 8. Ra7+ Kb8 9. Rb7+ Kc8 10. Rc7+ Kd8 11. Rd7+ Ke8 12. Re7+ Kf8 13. Rf7+
5. .. Qe4 6. Rg6+ Qxg6 7. Ra5+ transposes back to the previous variation.
5. .. Qa8+ 6. Rg8 Qe4 7. Rg6+ also tranposes back.
Rh5, h1=Q then continue check
It’s not easy at all. In my opinion this is really a tablebase problem.
Here’s some info:
First of all the losing tries:
Rh5 h1=Q+ Rxh1 Rxh1+ Kg7 Kxe5 -+
Ra5 h1=Q+ Rh5 Qb1 -+
Now what seems to work:
Rd5+
If the king goes in the direction of the H-file:
..Ke6 Rge5+ Kf6 Rf5+ Kg6 Rg5+ Kf6=
..Ke6 Rge5+ Kf6 Rf5+ Kg6 Rg5+ Kh6 Rh5+ Kg6 Rxh2 +-
So the king must go in the direction of the A-file. Going back at any point before reaching the A-file will be a draw by the mechanism above. So:
..Kc6 Rc5+ Kb6 Rb5+ Ka6
Here I spent an hour (or two) looking at Ra5+ Rxa5. Ultimately it loses but there are many ways black can go wrong.
Here I cheated and turned to the tablebase, only to find that the solution is rather complex.
Correct is after Ka6, Rh5!! h1=Q Rbg5!! Qa8+ Rg8 Qe4 Rg6+ Qxg6
I saw that a position with the king on d6 instead was available from the original position with:
Rh5 h1=Q Reg5 Qa8+ Rg8 Qe4 Rg6+ Qxg6
Notice the similarity between this and:
Rd5+ Kc6 Rc5+ Kb6 Rb5+ Ka6 Rh5 h1=Q Rbg5 Qa8+ Rg8 Qe4 Rg6+ Qxg6
The question is why does the king on d6 vs. a6 make the difference between a draw and a loss?
It appears that with the king on a6, white can force the king onto the 8th rank since it has to avoid capturing the rook, and doesn’t want to allow white to skewer the queen forcing a draw.
If the king escapes the 8th rank without capturing the rook, white loses since the king can hide on h6.
The same problem exists in the line that begins with the king on d6, and this is the difference.
How a human is supposed to figure this out I do not know. While playing for a stalemate, or using stalemate as a feature in the solution did occur to me, finding these highly counterintuitive moves to make it happen is a tall order imo.
I’ll concede that it may be my current lackluster chess ability talking, but Rbg5 in particular seems especially hard to find.
Queen and rook vs. two rooks is usually a win for the side with the queen. To go into it willingly to get a draw is psychologically difficult.
Rook check until Ka6 then Rh5 after black queens Ra5+ if king b6 then check until RxR or Rh5 then draw
1.Rd5 + Kc6 2.Rc5+ Kb6 3.Rb5+ Ka6 4.Ra5 +
(if 4.Rh5 then 4…h1:Q 5.Ra5+ Kb6 wins)
4…Rxa5 5.Rg6+ Kb5 6.Rh6 Ra2 7.Rh4 Kc5 8.Kg7 Kd5 9.Kg6 Ke5 10. Kg5 Rg2+ 11.Kh6 and the black’s king cannot attack the withe’s rook
Push king to a-file then Rh5
1.Rh5 h1=Q; 2. Ra5[…Rxa5 3.h5xQ or …Qxh5 3.a5xQ] black queen and rook can’t check and remain under white’s towers pressure (?)
It seems to me that the white rook presently on e5 has to keep checking. If the black king heads to the “a” file, then the mobile rook can come to f5.
If the black pawn queens then the rooks can deliver check mate. If the black rook moves to f or g , keep checking with the rooks on the 5th rank. Cannot think of anything else.
The basic idea seems to be to drive the BK to a6 with a series of checks using the Re5 (Black must continually move the K toward the a-file or else there will be an unavoidable perpetual using the Rg5). Once this is accomplished, white can play Rh5 h1Q Rbg5!! Black has no checks in this position, and White is actually threatening mate with the rooks, which will force Black to give his Q for a R, leading to a drawn position.
This type of problems appeals to me.
1. Rd5+ Kc6/Kc7
Enforced. 1. … Ke6/Ke7 2. Rge5+! must lead to an infinite repetition of moves since K has nowhere to hide.
2. Rc5+ Kb6
3. Rb5+ Ka6 (Ka7 looks not so smart)
Black king in a-file looks nice. A-file closed wins a tempo for white.
4. Rh5! h1=Q (Ra2 can be no better. And black has no direct checks to reply with.)
5. Ra5+! Kb5 (Only attempt. Rxa5? Rxh1! is draw!)
6. Rb5+
Since white was not scared by having both rooks hanging at the same time, then obviously, no matter what black plays, white will simply continue checking with his leftmost (queen side) rook, always keeping the other rook on h5.
E.g. … 10. … Kg6 11. Rfg5+ Kf6 … 16. … Ka6 17. Ra5+ etc.
We must have reached a conclusion.
This is a draw after 50 moves.
1Rd5 kc6 2Rc5 kb6 3Rb5 ka6 4Rh5 h1=q
5Rb5 to g5 6Qc6 rg6 7Qxr6 Ra5+ stalemate
If 6 qa8+ 7Rg8 qr7 or b6 8 Rg6 draw
In continuation of my previous attempt, I would like to venture the opinion that if the black King ventures into the “a” file and leaves the a6 square and heads for a7 or a8 squares, it is losing for black in all variations. In fact, black seems to have to struggle to stay in the game and force the draw.
Re-d5+.
Perpetual checks until Ka6. Then, Rh5, h8(Q)
Ra5+, Rxa5
RxQ with a drawn rook endgame.
If after Ra5+, black moves Kb6, then Rb6+ with perpetual checks until Ka6 picking up the line above with Ra5+.
Rh5 h1Q
Rd5 + Kc6
Rc5 + Kb6
Rb5 + Ka6
Ra5 + if Rxa5
Rxh1 draws else perpetual with the Rook checking in the 5th rank
This line does not work!
1.Rd5+ Kc6
2.Rc5+ Kb6
3.Rb5+ Ka6
4.Ra5+ Rxa5
5.Rg6+ Kb5
6.Rh6 Ra2
7.Rh3 Kc4
8.Kg7 Kd4
9.Kf6 Rg2
white wins 1-0
This line does not work!
1.Rd5+ Kc6
2.Rc5+ Kb6
3.Rb5+ Ka6
4.Ra5+ Rxa5
5.Rg6+ Kb5
6.Rh6 Ra2
7.Rh3 Kc4
8.Kg7 Kd4
9.Kf6 Rg2
white wins 1-0
I saw partially the solution but then i couldnt see further. Even my computer could not find the solution! Only with nalimov tablebases i could see the answer. Wow!
Lorfa,
The king must be pushed to the a-file specifically to stop black from playing Ra8+ after white has returned the rook to g5.
Qa8+ still wins with the king on d6 and it is not prevented by pushing the king to the a-file.
So preventing the rook from going to a8 is therefore not the essential difference.
It helps considerably of course, as Ra8+ is devastating.
Black can prevent white from getting 50 checks
or threefold repetition by moving his King to Ka6.
1. Rd5+ Kc6
{1. Rh5? h1Q! 2. Rxh1 Rxh1+! 3. Kg7 ( 3. Rh5 Rxh5+ -+) Kxe5 -+}
2. Rc5+ Kb6 3. Rb5+ Ka6
( 3. …Ka7? 4. Ra5+ Rxa5 5. Rxa5+ Kb6 6. Rh5 h1Q 7. Rxh1 +- )
4. Rh5!! h1Q
( 4. … Ra2 5. Ra5+! Rxa5 6. Rxh2 draw = )
5. Ra5+! Rxa5 6. Rxh1 draw =
Marcelo
Lorfa,
My apologies, you did find a wrinkle I had missed previously, and I had misread a part of your comment.
@ marcelo
After Rd5+ Kc6 Rc5+ Kb6 Rb5+ Ka6 Rh5 h1=Q
Ra5+ doesn’t work as black still wins with Kb6.
Sample line:
Rd5+ Kc6 Rc5+ Kb6 Rb5+ Ka6 Rh5 h1=Q Ra5+? Kb6 Rb5+ Kc6 Rc5+ Kd6 and now Rd5+ is not available since the queen can simply take it.
After Rd5+ Kc6 Rc5+ Kb6 Rb5+ Ka6 Rh5 h1=Q the only move that draws is Rbg5.