
Hello everybody, and welcome to a third article of the “Understanding Chess with Grandmaster Illia Nyzhnyk” series. In the last article, I talked about king safety, and what one should be looking for when making a decision on how to defend their king. This time, I would like to “reverse the roles” and discuss what one can do to launch a crushing attack against their opponent’s king. Please consider the following diagram:
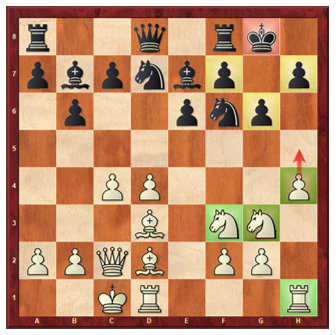
Let’s take a few minutes to figure out what is going on in this position. One of the most important things to know about it is that the kings are on opposite sides of the board. This is one of the prerequisites for a successful attack – positions where kings are on the opposite sides of the board provide better opportunities for aggressive actions. The reason for that is because hiding a king in the opposite direction allows us to use pieces that we would otherwise use as our king’s defenders. In the example above, those are both of our knights, the pawn located on the h4 square, and the rook that is on h1 square. Let’s take a look what happens when we move our h4 pawn up one square:
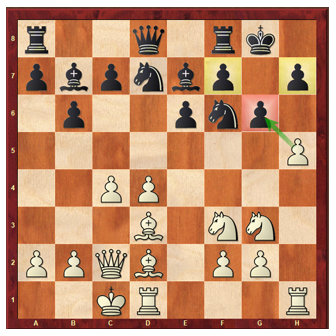
As you remember from the previous article, the king’s “shield” which the 3 marked pawns closest to the king is black’s main source of defense. For this reason, to make our attack effective we need to “overwhelm” those pawns by continuously attacking them using our own pawns and pieces. To get a better understanding of what we achieve by doing this, please take a look at the following position which occurs after we trade our h5 pawn for one of the “shield” pawns in black’s position:
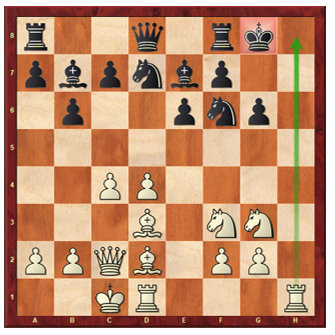
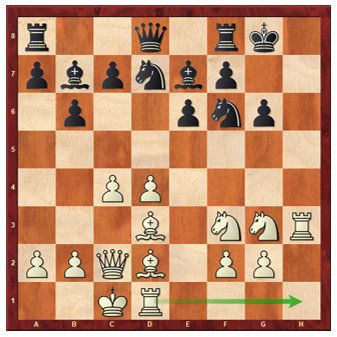
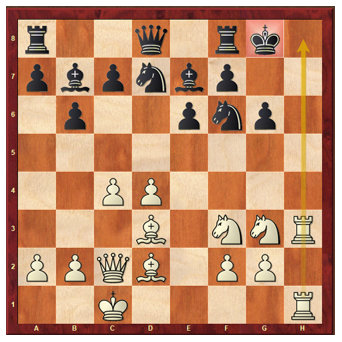
As we can see, after the pawn trade occurred black has lost one of his “shield” pawns, and for that reason the h-file is now completely exposed. This signifies the second stage of our attack, which is to use this exposed file by flooding it with our pieces. The end goal is shown with the arrow (which is not possible to execute now, as we only have a single rook attacking that square). The following positions demonstrate a chess motive known as “doubling the rooks” which is known to be an extremely effective way during the attack:
← The first rook moves up freeing the h1 square for the second rook
← The second rook moves behind the first rook creating a “battery” on the h-file. Both rooks are now attacking the h8 square next to the black king, and pose a threat of a check on that square
These examples bring us to the point that attacking in chess is like peeling layers of an onion. We need to gradually remove layer by layer until there is nothing left, and our opponent’s king is completely exposed.
Thank you for reading this article!
In my next article I will go a little deeper into the art of the attack and talk about how to position your pieces effectively so that they are always ready to jump into the action when an opportunity presents itself.
Also nice tactics follow once H-File is opened. Like
1) Bg6 fg6, 2) Qg6++