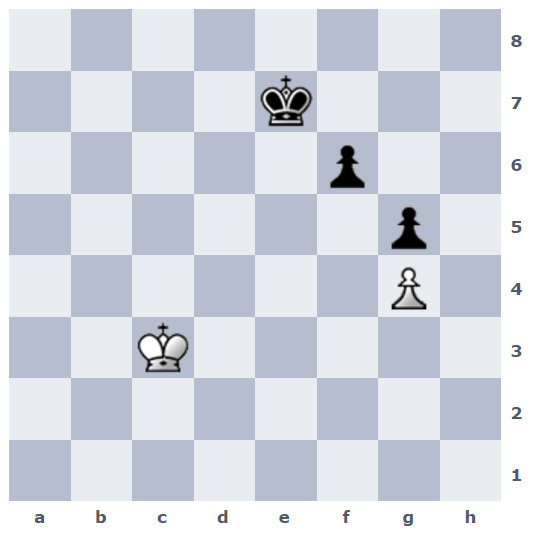
1.Kd3 isn’t obvious, especially after yesterday’s puzzle, but it is the right move for White, but a question will have to be addressed- why can’t Black take the long distance direct opposition to win? This is related to the puzzle from yesterday where the defender had to take the long distance opposition to draw (Black in that case). Here the defender (White) can’t do that and has to allow it to the aggressor; so why doesn’t it help Black here? It ultimately comes down to the nature of the derivative K+P vs K endgame that is latent in this position after the eventual exchange of pawns at f5. I actually mentioned this feature a week or two ago in one of the other variations of these K+2P vs K+P endings, so it is good to see it come up again.
1. Kd3 Kd7
Black takes the long distance opposition. The idea is for black to take the direct opposition if the white king continues by moving forward to d4 or e4 by playing to d6 or e6 respectively to win. If the white king retreats to d2 or e2, black again takes the long distance opposition from d6 or e6 respectively to win. And if the white king goes to c3 or c4, black goes to e6 or e6/c6 to win. I am just going to discuss what happens to 2.Ke4?? so that I have a basis for the rest of the discussion:
2. Ke4??
Most experienced players should recognize why this is bad, but here it is laid out explicitly:
2. ……………Ke6!
This should be the only winning move. Black is in position to support the advance of f5, but must carefully choose the moment. White has four moves, Kd4, Kd3, Ke3, and Kf3, and they all lose, but the initial play is different depending on white’s choice. Let’s look at the first two to get the idea of why White is now lost:
3. Kd4 f5! (Here, Kd6 holds the win, too, but is a subvariation only)
4. Ke3
The most resistance White can offer. If White takes the pawn, Black recaptures and wins easily: [4.gf5 Kf5 5.Ke3 Kg4! 6.Kf2 Kh3 7.Kg1 g4 8.Kh1 g3 9.Kg1 g2 10.Kf2 Kh2-+]. With 4.Ke3, White tempts Black into erring. Continuing:
4. …………..f4! (fxg4 should also win, but I count at least two extra moves at a glance)
It might tempt some to play Ke5 here taking the opposition, but that draws only: [4. ….Ke5? 5.gf5! Kf5 6.Kf3!= see more below]. Continuing:
5. Ke4
White retakes the opposition, but the passed pawn of Black kills him; Black just backs up since white can’t come forward, and can’t follow to block the coming flank from the queenside (Black doesn’t worry about the g-pawn since white would lose a race badly). Continuing:
5. …………..Kd7
Black wins regardless of where the king goes, but this move should be shortest, though my count shows the likelihood that Ke7 is also as short (d6 is reached by either move in some lines). This move probably looks a bit weird, but it will be clearer in just a moment:
6. Kd3
It might be the case that Kd4 is more resistant, but the lines are bit fuzzy for me right now to do an accurate count, and I want to finish this soon because I have things to do today. In any case, I think Kd3 makes more sense anyway- it prevents black from taking the direct opposition from d6 and forcing white to give significant ground earlier. Continuing:
6. …………Ke7
Again, I know this looks weird- it was weird to me the first time I ever studied this kind of ending two decades ago, but there is an iron-clad logic to why this is the shortest method for black. Think about it right now how it has now changed from 5.Ke4: if the white king comes forward to either d4 or e4 again, black can now take the direct opposition to force white into a clearly lost line. This is the effect of how that passed pawn has constrained the White’s options. It is all downhill now:
7. Ke4
Or immediately give way- this might not be the most resistant line, but I think is has to be the most critical:
7. …………Ke6
8. Kd4 Kd6
The flanking now begins in earnest. The maneuvering to the seventh rank seen at moves 5 and 6 were simply to give black this opposition at moves 7 and 8. White’s king cannot follow beyond c4 without letting the f-pawn run. I dont’ think it matters to length what White does now- the game is pretty much the same in all variations from this point:
9. Ke4 Kc5 (definitely shortest from here)
10. Kd3 Kd5
11. Kd2 Ke4 and it should be obvious that Black will push f3, play Kf4 and Kxg4 if necessary to win easily.
Now lets return to move three in the following line and look at White’s other futile moves:
1. Kd3! Kd7
2. Ke4?? Ke6
3. Kd3 Kd5
I don’t think 3. …f5 is shorter, but it will win, too- either White takes the pawn leading to a lost ending, or if White chooses a king move, Black plays f4 as I showed above in the 3.Kd4 line. With 3. …Kd5, Black just takes the territory White offers:
4. Ke3 Ke5
5. Kf3 Kd4
6. Kf2 Ke4
7. Kg3 Ke3 and it should be obvious that white can’t even hold the g-pawn.
The lines after 3.Ke3 and 3.Kf3 are similar in nature to what is discussed above. I am going to end this comment here, and return to the critical drawing lines for white on his second move.
So, what does White need to do at move two in the following start?
1. Kd3! Kd7
I showed, I hope, why 2.Ke4 is a loser, and it is left as an exercise why Kd4 will lose analogously- the point of Black’s 1st move to begin with. If white give ground with a move to the 2nd rank at d2 or e2, Black just follows and reimposes the long distance opposition from either d6 or e6. It is important that White give no further ground since Black will always be waiting to take the opposition when white tries to return to the third rank. This leads to 2.Ke3:
2. Ke3! Ke7
What other plan can Black have other than pushing the f-pawn which I discuss at the end? White is threatening Ke4 if Black tries a flanking move like Kc6 (though Black would have enough time to get back to e7 to protect the backward f-pawn). If Black plays 2. …Ke6, White takes the opposition from e4 and prevents Black from playing a winning f5 by having cover by the king on that square. At least, Black is tempting white to make a mistake with 2. …Ke7.
3. Kd3!
The only draw, as in the beginning position! The white king cannot come forward and cannot retreat backwards, and cannot play to f3 since Black plays Kd6 and will eventually either gain the opposition from e6 or e5 to win the game- I will leave that line as an exercise since it incorporates the other ideas discussed earlier.
Now, all that is left is to discuss what happens when Black pushes the f-pawn at the start. This is critical to understand:
1. Kd3! f5!?
2. gf5! Kf7 (If Kf6 3.Ke4, or even 3.Ke2/e3 as is demonstrated below)
3. Ke4
White draws with every move but those king moves to the c-file, but I want to show this one for a reason because it is the one drawing move that looks most likely to be a losing one:
3. ………….Kf6
The point in trying 2. …Kf7 was to play Kf6 in response to the natural Ke4 protecting the white pawn- the white king must now allow Black to capture the pawn, but the resulting ending is drawn in two different ways:
4. Ke3 Kf5
5. Kf3
Taking the opposition against the black king. I will leave it as an exercise why this is drawn. However, even if White had played to f3 before Black captured the pawn……
4. Kf3 Kf5
Black takes the opposition against White here, but……
5. Kg3!
It is stilll drawn. That arrangement in the K+P vs K ending, where the kings are in opposition with the pawn next to and on the same rank as its king is drawn regardless of who has to move, unless the defender king has been pushed to his first rank, and it is drawn even then if the pawn is a g or b-pawn. This is the reason behind the chess adage about the single pawn ending-“get the king out in front”- being alongside isn’t nearly as good. I have played thousands of online blitz and short time limit games, and this particular K+P vs K ending has been an issue in literally dozens of them explicitly, or been where other endings were likely to end up if pieces or pawns were going to be exchanged.

1.Ke3 draws
I can’t see any improvement on 1.Ke3?????!
I may be barred because of illegal activity 1.Ke3!
1.Kd3 Kd7 2.Ke3 Ke7 3.Kd3 Ke6 4.Ke4 Kd6 5.Kd4 Kc6 6.Ke4 Kd6 7.Kd4 and White draws (7.Kf5? Ke7 8.Ke4 Ke6 9.Kd4 f5 10.Ke3 f4+ 11.Ke4 Kd6 12.Kd4 f3 13.Ke3 Ke5 14.Kxf3 Kd4 15.Kf2 Ke4 16.Ke2 Kf4 17.Kf2 Kxg4 18.Kg2 also draws)
No, 10.Ke4 Ke7! 11.Kd4 Kd6 12.Ke4 Kc5 13.Kf3 Kd5 and Black wins in the 7.Kf5? line.
I meant 11.Ke4 Ke7. Should have stuck with Professor Bhat’s move.
1.Kd3 isn’t obvious, especially after yesterday’s puzzle, but it is the right move for White, but a question will have to be addressed- why can’t Black take the long distance direct opposition to win? This is related to the puzzle from yesterday where the defender had to take the long distance opposition to draw (Black in that case). Here the defender (White) can’t do that and has to allow it to the aggressor; so why doesn’t it help Black here? It ultimately comes down to the nature of the derivative K+P vs K endgame that is latent in this position after the eventual exchange of pawns at f5. I actually mentioned this feature a week or two ago in one of the other variations of these K+2P vs K+P endings, so it is good to see it come up again.
1. Kd3 Kd7
Black takes the long distance opposition. The idea is for black to take the direct opposition if the white king continues by moving forward to d4 or e4 by playing to d6 or e6 respectively to win. If the white king retreats to d2 or e2, black again takes the long distance opposition from d6 or e6 respectively to win. And if the white king goes to c3 or c4, black goes to e6 or e6/c6 to win. I am just going to discuss what happens to 2.Ke4?? so that I have a basis for the rest of the discussion:
2. Ke4??
Most experienced players should recognize why this is bad, but here it is laid out explicitly:
2. ……………Ke6!
This should be the only winning move. Black is in position to support the advance of f5, but must carefully choose the moment. White has four moves, Kd4, Kd3, Ke3, and Kf3, and they all lose, but the initial play is different depending on white’s choice. Let’s look at the first two to get the idea of why White is now lost:
3. Kd4 f5! (Here, Kd6 holds the win, too, but is a subvariation only)
4. Ke3
The most resistance White can offer. If White takes the pawn, Black recaptures and wins easily: [4.gf5 Kf5 5.Ke3 Kg4! 6.Kf2 Kh3 7.Kg1 g4 8.Kh1 g3 9.Kg1 g2 10.Kf2 Kh2-+]. With 4.Ke3, White tempts Black into erring. Continuing:
4. …………..f4! (fxg4 should also win, but I count at least two extra moves at a glance)
It might tempt some to play Ke5 here taking the opposition, but that draws only: [4. ….Ke5? 5.gf5! Kf5 6.Kf3!= see more below]. Continuing:
5. Ke4
White retakes the opposition, but the passed pawn of Black kills him; Black just backs up since white can’t come forward, and can’t follow to block the coming flank from the queenside (Black doesn’t worry about the g-pawn since white would lose a race badly). Continuing:
5. …………..Kd7
Black wins regardless of where the king goes, but this move should be shortest, though my count shows the likelihood that Ke7 is also as short (d6 is reached by either move in some lines). This move probably looks a bit weird, but it will be clearer in just a moment:
6. Kd3
It might be the case that Kd4 is more resistant, but the lines are bit fuzzy for me right now to do an accurate count, and I want to finish this soon because I have things to do today. In any case, I think Kd3 makes more sense anyway- it prevents black from taking the direct opposition from d6 and forcing white to give significant ground earlier. Continuing:
6. …………Ke7
Again, I know this looks weird- it was weird to me the first time I ever studied this kind of ending two decades ago, but there is an iron-clad logic to why this is the shortest method for black. Think about it right now how it has now changed from 5.Ke4: if the white king comes forward to either d4 or e4 again, black can now take the direct opposition to force white into a clearly lost line. This is the effect of how that passed pawn has constrained the White’s options. It is all downhill now:
7. Ke4
Or immediately give way- this might not be the most resistant line, but I think is has to be the most critical:
7. …………Ke6
8. Kd4 Kd6
The flanking now begins in earnest. The maneuvering to the seventh rank seen at moves 5 and 6 were simply to give black this opposition at moves 7 and 8. White’s king cannot follow beyond c4 without letting the f-pawn run. I dont’ think it matters to length what White does now- the game is pretty much the same in all variations from this point:
9. Ke4 Kc5 (definitely shortest from here)
10. Kd3 Kd5
11. Kd2 Ke4 and it should be obvious that Black will push f3, play Kf4 and Kxg4 if necessary to win easily.
Now lets return to move three in the following line and look at White’s other futile moves:
1. Kd3! Kd7
2. Ke4?? Ke6
3. Kd3 Kd5
I don’t think 3. …f5 is shorter, but it will win, too- either White takes the pawn leading to a lost ending, or if White chooses a king move, Black plays f4 as I showed above in the 3.Kd4 line. With 3. …Kd5, Black just takes the territory White offers:
4. Ke3 Ke5
5. Kf3 Kd4
6. Kf2 Ke4
7. Kg3 Ke3 and it should be obvious that white can’t even hold the g-pawn.
The lines after 3.Ke3 and 3.Kf3 are similar in nature to what is discussed above. I am going to end this comment here, and return to the critical drawing lines for white on his second move.
So, what does White need to do at move two in the following start?
1. Kd3! Kd7
I showed, I hope, why 2.Ke4 is a loser, and it is left as an exercise why Kd4 will lose analogously- the point of Black’s 1st move to begin with. If white give ground with a move to the 2nd rank at d2 or e2, Black just follows and reimposes the long distance opposition from either d6 or e6. It is important that White give no further ground since Black will always be waiting to take the opposition when white tries to return to the third rank. This leads to 2.Ke3:
2. Ke3! Ke7
What other plan can Black have other than pushing the f-pawn which I discuss at the end? White is threatening Ke4 if Black tries a flanking move like Kc6 (though Black would have enough time to get back to e7 to protect the backward f-pawn). If Black plays 2. …Ke6, White takes the opposition from e4 and prevents Black from playing a winning f5 by having cover by the king on that square. At least, Black is tempting white to make a mistake with 2. …Ke7.
3. Kd3!
The only draw, as in the beginning position! The white king cannot come forward and cannot retreat backwards, and cannot play to f3 since Black plays Kd6 and will eventually either gain the opposition from e6 or e5 to win the game- I will leave that line as an exercise since it incorporates the other ideas discussed earlier.
Now, all that is left is to discuss what happens when Black pushes the f-pawn at the start. This is critical to understand:
1. Kd3! f5!?
2. gf5! Kf7 (If Kf6 3.Ke4, or even 3.Ke2/e3 as is demonstrated below)
3. Ke4
White draws with every move but those king moves to the c-file, but I want to show this one for a reason because it is the one drawing move that looks most likely to be a losing one:
3. ………….Kf6
The point in trying 2. …Kf7 was to play Kf6 in response to the natural Ke4 protecting the white pawn- the white king must now allow Black to capture the pawn, but the resulting ending is drawn in two different ways:
4. Ke3 Kf5
5. Kf3
Taking the opposition against the black king. I will leave it as an exercise why this is drawn. However, even if White had played to f3 before Black captured the pawn……
4. Kf3 Kf5
Black takes the opposition against White here, but……
5. Kg3!
It is stilll drawn. That arrangement in the K+P vs K ending, where the kings are in opposition with the pawn next to and on the same rank as its king is drawn regardless of who has to move, unless the defender king has been pushed to his first rank, and it is drawn even then if the pawn is a g or b-pawn. This is the reason behind the chess adage about the single pawn ending-“get the king out in front”- being alongside isn’t nearly as good. I have played thousands of online blitz and short time limit games, and this particular K+P vs K ending has been an issue in literally dozens of them explicitly, or been where other endings were likely to end up if pieces or pawns were going to be exchanged.