
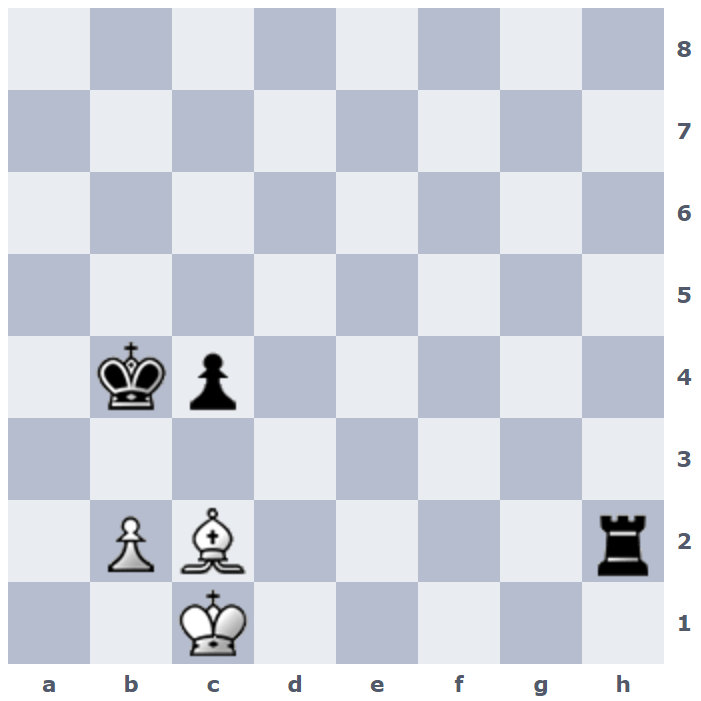
White to move. Is this a draw or loss for white? What is the best game plan for white?
White to move. Is this a draw or loss for white? What is the best game plan for white?
| M | T | W | T | F | S | S |
|---|---|---|---|---|---|---|
| 1 | 2 | 3 | 4 | 5 | 6 | 7 |
| 8 | 9 | 10 | 11 | 12 | 13 | 14 |
| 15 | 16 | 17 | 18 | 19 | 20 | 21 |
| 22 | 23 | 24 | 25 | 26 | 27 | 28 |
| 29 | 30 | |||||
It will be nice ?
What are you laughing at 🙂 ? If you’ve got a can of zugzwang repellent or a chest of draws we could use some help here.
I think this is a draw and White’s best plan is to set up a stalemate defence with K@a1 and B@b1
e.g. 1.Kb1 c3 2.bc+ Kxc3 3.Be4 Re2 4.Bh7 Re1+ 5.Ka2 Re2+ 6.Ka1 Kb3 7.Bb1 and Re1 would be stalemate, or if Black avoids an exchange of pawns the b pawn can’t be forced to advance.
1.Kb1 Rf2 2.Kc1 c3 3.Kb1 Rg2 so 1.Kb1 loses
1.Bd1 Rh1 2.Kc2 Rf1 3.Bh5 Rf2+ wins
1.Bd1 Rh1 2.Kc2 Rf1 3.Kc1 c3 wins and so white loses.
No, 1.Kb1 Rf2 2.Kc1 c3 3.Kb1 Rg2 4.bc Kxc3 5.Be4 draw!
There are usually 2 possibilities in such positions: either a fortress can be built
or some zugzwang strategies force the weaker side to discoordinate such
fortress. It seems to me it is the latter in this case.
First observation: if it is Black’s move it is an easy win 1… c3 2. bc Kxc3 and White
is trapped, eg. 3. Be4 Re2 4. Bf3 Re1+ 5. Bd1 Kd3 zugzwang and B is lost. Not
exchanging pawns 1…. c3 2. b3 does not help either, 1… c3 2. b3 Rh1+
3. Bd1 Rxd1+ 5. Kxd1 Kxb3 6. Kc1 c2 and the c pawn promotes.
As James correctly notes after 1. Kb1 c3 is not so deadly, so perhaps one has to
use some zugzwangs to force White to return to the above variations.
It can start with 1. Kb1 Rd2 and then what next? Any B move on b1-h7 diagonal
allows Kb3 and Rxb2 next, so the only move is to move K back to c1.
Then c4-c3 kills the way shown above. For instance 1. Kb1 Rd2 2. Kc1 c3
3. bc Kxc3 4. Ba4 Ra2, and so forth.
Yes, I should have realised that the BK could move in to make a 2 to 1 attack on the b pawn in a lot of lines but again I let my guard down because it took me some time to see the stalemate possibility and I was too relieved that there was a possible way out and I’d been looking at lines with B@d1 and after c3 playing b3 and trying to hold with Kc2c1 so I wasn’t worried enough about the pawn being captured at b2.
Yancey below notes that in the initial position after 1… c3 2. Kb1! is possible.
He is right, no zugzwang tactics seems to work, smells drawish then.
I’m pretty certain that 1.Kd1 fails against Rh1+ so 1.Kb1 has to be the right move and the convention that the side to play gets at least a draw means that it should be a draw, although there are obviously a lot of problems with hanging on in some lines.
Pushing the P is obviously hopeless. Moving the B off the d1-a4 diagonal also loses quickly to 1… Kb3. So the only moves to consider are Kb1, Kd1, and Bd1.
1. Bd1 d3! wins for Black essentially by denying Whit the opportunity to reach the position Ka1 Bb1 with the pawns off the board.
1. Kb1 Rh1+ 2. Ka2 and Black forces the B off the d1-a4 diagonal by moving the R along the first rank.
So unless 1. Kd1 holds the draw, white is lost. Fortunately for white, it does seem to hold. For instance:
1. Kd1 Rh1+ 2. Kd2 Rg2 3. Ke2 Rc1 4. Kd2 and it doesn’t seem like Black can make any headway.
1. Kd1 Rh1+ 2. Kd2 Rh2+ 3. Kd1 (or Kc1) and Black has no way to make progress.
1. Kd1 c3 2. bc+ K:c3 and White uses his B to keep Black from playing ….Kd3, preventing the normal K+R vs. K mating positions.
Also note that White Ka1 Bb1 and Black Ka3 cannot force mate as long as the White B stays on the b1h7 diagonal since Black’s R cannot pin the B without creating a stalemate.
1.Kd1 Rh1+ 2.Kd2 Rg1 3.Bd1 Rg2+ 4.Kc1 c3 wins
1.Kb1 Rh1+ 2.Ka2 Rc1 3.Bb1 draws
1.Kd1 Rh1+ 2.Kd2 Rg1 3.Ke2 Ra1 wins
1.Kb1 Rh1+ 2.Ka2 Rg1 3.Bb1 draws
James,
1. Kb1 Rh1!
2. Ka2 Rg1
3. Bb1 Rg2
Puts white in a bad, bad spot, in my opinion. Consider:
4. Be4 Re2
5. Bf3 Rf2
6. Be4 c3! will win the white pawn and the game. Or, at move 4:
4. Ka1 Rf2
5. Ba2
Of course, if Ka2 again, then black pushes c3 against the pinned b-pawn as above, and if the bishop plays to e4/g6/h7, then black plays Kb3 double attacking and winning the b-pawn. Continuing from 5.Ba2 above:
5. ………Rf6 (getting an eye on the a-file)
White has two options here, Bb1 and Kb1, but on either one, black is going to play Ra6 either eventually pinning the bishop, or attacking it forcing the king back to a1 again leaving the bishop pinned. After that, I think the black king is free to flank through c5, d4 and d3 to set up zugzwang. Just to sketch it out, it might go like this:
6. Kb1 Ra6
7. Ka1 Kc5
8. Kb1 Kd4
9. Ka1
Here, white can try b3, but that should lose to the simple c3 (or even Rb6????) giving black the winning passer, but I need to think about it bit more, and I am pressed for time right now. Continuing:
9. ……….Kd3
10. Kb1 Ra7
A simple waiting move. White has no stalemates available. If he returns the king to a1, black will simply play Kc2 forcing white to play b3 or b4 and black can just play c3 by passing the pawn to give a simple win. Right now I don’t see how white avoids losing in this line at any point, but I do need a deeper look.
Yes, that’s pretty convincing. But I think 1.Rd1 Rh1+ is a win so I’m not sure what’s going on.
As I noted before, White loses when K is on c1, so 1. Kd1 makes no sense,
any waiting move (Rg2 or f2) leaves no other possibility but to return to the
initial deadly position. eg 1. Kd1 Rf2 2. Kc1 c3 wins easily.
1. Kd1 Rg2
2. Kc1 c3
3. Kb1!
Doesn’t win so easily for black that I can see. What threat can black mount now?
Consider:
1. Kd1 Rg2
2. Kc1 c3
3. Kb1! cb2
4. Kb2 Rf2 (waiting white out)
5. Kb1! Kc3 (Ka3 below)
6. Bh7
Any non-sacrificial bishop move will draw this. This position is a standard draw you will find in any chess endings textbook. There is simply no way for black to make progress:
6. ………..Rf1
If black tries Kb3, white can just check from g8, but Kc1 or even Ka1 draws- the latter because 7. ….Rf1+ 8.Bb1 leads to stalemate if black tries a waiting rook move along the rank. Continuing:
7. Ka2 and now what for black. This is a dead draw. Back at move 5 above:
5. ………..Ka3
6. Kc1
Non-sacrificial bishop moves also should draw with best play. What can black do from here? He can just play the rook back to g2, but….
6. ………..Rg2
7. Be4
Even Kd1 should draw- white need only avoid returning the king to b1, of course.
If 1. Kd1 doesn’t draw, it will have to be a line that isn’t 2. ….c3 which gives up the pawn. As of right now, I don’t see how black wins after 1.Kd1, though I haven’t done a complete look at all of black’s 1st and 2nd move options- but I don’t immediately see any of them offering progress over what I showed above.
Thank you Yancey for fleshing out my skimpy analysis. Yes, I should have mentioned 1. Kb1 Rhi+ 2. Ka2 Rf1 3. Bb1 Bf2 (it’s just cleaner to have the R on a dark square on the 2nd rank here).
And 1. Kd1 Rg2 2. Kc1 c3 does NOT win. White simply plays 3. Kb1 and, as Yancey says, this doesn’t win so easily for Black. In fact, it doesn’t even win with difficulty since White can draw easily whether Black captures on b2, checks on the first rank, or waits.
Sorry, the first variation should have 3…Rf2 for Black.
James,
1. Kd1 Rh1
Will only draw for black. The line you proposed I had noted yesterday (the attack by the rook from a2), but yesterday I didn’t really have an answer for it, so I didn’t say anything. I could see the problem white might have (specifically, after black’s 6th move in the main line), but my memory for that kind of position wasn’t all that certain- I remembered it as a draw, but I had to double check my memory. In any case, here is a full analysis:
2. Kd2
No different is 2.Ke2- if black checks again, the king returns to d1. I am going to cover your idea first, then cover the play should black try 2. ….Ra1 immediately. Continuing:
2. …………Rg1
3. Ke2!
This is forced for white. Of course, white can’t play 3.Ke3 because of the skewer from Rg2- the white king can no longer guard the bishop which has to move, and the pawn is lost. In addition, if white moves the bishop off the d1-a4 diagonal, the black king infiltrates b3 to win the white pawn; and if the bishop plays to d1, black checks from g2 (as you showed in one comment above) to either win the b-pawn immediately, or if the white king retreats to c1, black plays c3 to win: [3.Bd1?? Rg2 4.Kc1 c3! 5.b3 (or 5.cb3 Kc3-+) Rg1 6.Kc2 Rd1! 7.Kd1 Kb3 is a won ending for black].
3. ………….Ra1!? (a valiant try)
4. Kd2!
Another only move for white. Continuing:
4. ………….Ra2
5. Kc1!
Another only move. Now what for black? If he checks from a1, the king returns to d2 for repeating position. The only way forward is c3, which does force white to play with great care.
5. ………….c3!?
A tricky move! It tempts white to make a move with the pawn, but both of those moves lose:
6. bc3?? Kc3!
This is exactly the sort of position (a textbook position!) that is lost in a K+B vs K+R ending! If the bishop retreats to b1, black pins it and wins it on the next move. It does white no good to retreat it elsewhere:
7. Bf5
This should be the most tenacious move for the reasons you will see below. The most technically correct path for black is to attack the bishop while threatening mate from the other side:
7. …………Rf2
8. Bh3
Covering the mating square, but black just attacks again…
8. …………Rh2
9. Bg4
White lasts longer with 9.Bf1, but the pinning of the bishop in that line, and its capture is trivial. Continuing:
9. ………… Rh1
10.Bd1 Rg1
And the white king must give up the bishop and will soon be mated. Also at move 6, passing the c-pawn is not really better:
6. b3?? Ra1! (the only win)
7. Bb1 Kb3 and the bishop is lost on the next move.
So, lets return to a drawing move at move six for white.
6. Kb1
Here, 6.Bb1 is also good. While this move looks bad for white, it isn’t:
6. ………….Rb2
7. Kc1
Most players will look at this and think it must be won for black. However, this is a classic draw. It is a kind of position that is found in textbooks, too. Think about it- how is black going to make progress? The obvious try is to…..
7. …………..Ra2 (planning Ra1)
8. Be4
Here, 8.Bf5/g6/h7 are ok- the only danger is trying 8.Bd3 which allows 8. …Kb3 to win (i.e. 9.Bc4+ isn’t effective like 9.Bd5 is). Black’s problem is getting the king in to support the pawn’s advance, but the white bishop is going to either cut off the king by sitting on c2, or will harass from the rear while the white king keeps an eye on the b2 and d2 squares from c1, or the king will move up the c2 when the rook leaves the second rank. It is coordination problem for black that can’t be solved without white’s help. So, to try some plans, black must first get the rook off of a2 to pary the threat of check if the king moves to b3:
8. ……………Rf2
9. Bh7!
Another only move, I think. 9.Bg6 is no good because of Kb3 and the f7 square is under black’s control so white can’t check the black king on b3. Also, a move like 9.Bd5 runs into the problem of Rf4 breaking white’s hold on the b2/h7 diagonal for a critical move, which will be explained below. So, what is blacks best plan here? Checking from f1 advances nothing- the white king is happy as happy on c2 as on c1. The only real tries here are Kb3 and Ka3:
9. ……………Kb3
10. Bg8 Ka3
11. Bh7!
Another only move. Letting the black king into a1 is no danger to white. The danger is ever allowing black to play c2 with the black king within reach of c3 or b3 to double guard the pawn- that ending would be lost for white. That is why the bishop must return to h7 to put the guard back on c2- it is why white can’t give up the control of that b2/h7 diagonal. So, can black make progress?
11. ………….Ka2
12. Bg8
Here, Be4 is also ok. Continuing:
12. ………….Ka1 (or return to a3)
13. Bh7
White can now allow c2 since the black king is too far removed to protect it when white double attacks it, but this line is more critical in my view:
13. ………….Rf1
14. Kc2 Rf3 (or lose the pawn)
15. Kc1
Probably other moves draw, too, but repetition is white’s friend now. It won’t help black to try this attack from the other side, either. This is a dead draw. In my comment, I will discuss the idea where black tries for Ra1 immediately.
Finally,
1. Kd1 Rh1
2. Kd2 Ra1
This is tricky, but white just waits, but keeps an eye on b3 at the same time!
3. Bd1! Ra2
4. Kc1!
Not 4.Kc2??, which loses. It is instructive to discuss that:
4. Kc2?? c3!
5. Kb1
Attacking the rook, but…..
5. …………Rb2
6. Kc1
Now, it might look like this is the same drawing position I showed in the previous comment, however, there is one huge difference- the bishop not only isn’t blocking the c-pawn, but is open to a deadly attack. Black has a pretty method to win this:
6. ………….c2!!
The rook can’t be taken without allowing cxd1(Q). White can take the pawn, but ends up in the same losing K+R vs K+B ending I showed in the previous comment after black plays Kc3 double attacking the bishop. However, moving the bishop to f3/g4/h5 loses even more quickly…..
7. Bf3 Kc3! and mate follows on the next move.
So, back to the position after 4.Kc1:
4. Kc1!
Can black play c3 here? No, but white’s response has to be precise!
4. …………..c3!?
5. bc3! Kc3
Now, again, this might look lost for white, but here the bishop isn’t on c2, and white has a defense. This position is also a textbook drawing position from the chapter on K+R vs K+B endings:
6. Kb1
Obviously, this is white’s only hope, but it is good enough:
6. …………Rb2 (tempting white into Kc1??, but that is lost after Rf2)
7. Ka1!
Now what for black? The bishop prevents the black king from getting onto b3 or c2. If black attack the bishop with Rd2, white can just a4, or even f3/g4/h5 since he can check the black king if it goes to b3. The problem is that the white king is in the right corner for this particular bishop- the black king can never get to b3 or c2 successfully unless white blunders and allows it.
I conclude that 1.Kd1 is the only draw available to white, but tremendously challenging to actually hold.
Thanks very much 🙂