
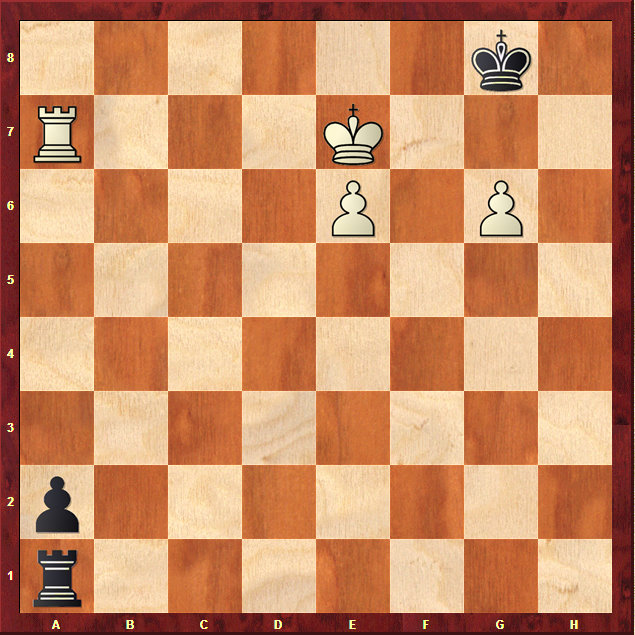
This is a very important endgame structure. It is White to move and win. A slight mistake will immediately cost White 1/2 point. Can you find the winning plan?
6k1/R3K3/4P1P1/8/8/8/p7/r7 w – – 0 1
Keres, 1944

Chess Daily News from Susan Polgar
This is a very important endgame structure. It is White to move and win. A slight mistake will immediately cost White 1/2 point. Can you find the winning plan?
6k1/R3K3/4P1P1/8/8/8/p7/r7 w – – 0 1
Keres, 1944
| M | T | W | T | F | S | S |
|---|---|---|---|---|---|---|
| 1 | 2 | 3 | 4 | 5 | 6 | 7 |
| 8 | 9 | 10 | 11 | 12 | 13 | 14 |
| 15 | 16 | 17 | 18 | 19 | 20 | 21 |
| 22 | 23 | 24 | 25 | 26 | 27 | 28 |
| 29 | 30 | |||||
Let’s look at some of the moves to lose the half-point:
1. Ke8
A tempting move visually, at least to me. But black draws almost instantly with
1. …..Re1!
And white has conceded the advantage:
2. e7
Here, Ra2 is met by Re6+ followed by Rg6 giving a clear draw.
2. …..a1(Q)
3. Ra1 Ra1
And this is still drawn:
4. Kd7 Rd1 (lots of drawing moves)
And nothing white can do to prevent the capture of the e-pawn with the rook followed by the black king rounding up the g-pawn.
Also, at move 1, white accomplishes nothing with Kd8:
1. Kd8 Rd1
2. Kc8 a1(Q)
3. Ra1 Ra1
4. e7 Re1
And this is just like the previous line.
Nor can white accomplish anything with 1. g7
1. g7 Kg7
2. Kd8 Kf6
3. e7
This is now forced:
3. …..Rd1
4. Kc8 a1(Q)
5. Ra1 Ra1
6. e8(Q)Ra8
7. Kd7 Re8
8. Ke8
With a draw. Also, at move 4 in this line, it won’t help white to keep the king on the seventh rank to prevent that last skewer:
4. Kc7 Ke7=
Also, at move 1, white won’t accomplish anything with Kf6 other than make his own life difficult:
1. Kf6 Rf1 (only move, I think)
2. Ke5!
This is an only move. On Ke7 black wins: [2.Ke7 a1Q 3.Ra1 Ra1 4.Kd7 Ra7 5.Kd6 (5.Kd8 Kf8! 6.Kc8 Kg7 7.Kd8 Kf6! 8.g7 Rg7-+) 5. …Kf8 6.Kd5 Kg7 7.Kd6 Kg6 8.e7 Kf7-+]. Continuing:
2. …..a1(Q)
3. Ra1 Ra1
4. e7 Kg7
5. Ke6!
And black won’t be able to mop up the g-pawn in time to bring the king to bear on the e-pawn, and will be forced to give up the rook for the e-pawn, or give endless checks from distance.
In my next comment, I will discuss what I think is the winning plan.
In my previous comment, I think I eliminated the king moves and the pawn move from the possibly winning for white. We are left with the rook moves. There are various ones white could play, and I can’t be sure that they win or lose (some may transpose to the line I have in mind, but some may not).
1. Ra8 Kg7
2. Ra6! Kg6 (alternatives below)
3. Ke8!
When we discussed 1.Ke8 earlier, Re1 for black drew because black takes with check at e6 followed by the capture at g6 when white captures at a2 at move 2, but here 3. …Re1 will fail to e7 with check. Let’s look at what I mean:
3. …..Re1
4. e7 Kg7
5. Ra2
And this has reduced to a won R+P vs R ending for white. We will look at the main variations from this point to demonstrate the point:
5. …..Rb1
6. Re2 Rd1
To keep the king hemmed in. Here [6. …Rb8 7.Kd7 Rb7 (7. …Kf7 8.Rf2 Kg7 9.e8Q+-) 8.Kc6+-].
7. Rg2 Kh6 (Kf6 8.Kf8+-)
8. Rg4
Preparing the shield for the white king. Continuing:
8. …..Kh5
Here [8. …Re1 9.Kd7 Rd1 10.Kc6 Re1 (10. …Rc1 11.Kd6 Rd1 12.Ke5 Re1 13.Re4+-) 11.Kd6 Rd1 (11. …Kh5 12.Rg8 Rd1 13.Kc5 Rc1 14.Kd4 Rd1 15.Kc3 Rc1 16.Kd2+-) 12.Ke5 Re1 13.Re4+-]. Continuing:
9. Rg8 Kh6
10.Kf7 Rf1 (what else?)
11.Ke6 Re1
12.Kd6 Rd1 (Kh7 13.e8Q+-)
13.Kc5 and white will walk the rook down. Back at move 5, black still loses with
5. …..Rd1
6. Rg2 Kh7 (Kf6 7.Kf8+-)
7. Rg4 with a finish much like that of the above line. Or, at move 5:
5. …..Kf6
6. Kf8! Re7 (Rh1 7.Rf2 Kg6 8.e8Q+-)
7. Rf2 Ke6
8. Re2 Kf6/d6
9. Re7+-
So, back at move 3, did black have any better move than Re1? Not really.
3. …..Kg7
4. e7 Kg8
Here: [4. …Kh7 5.Ra3 Kg6 6.Rg3 Kf6 7.Rf3 Kg6 8.Rf2! Kg7 9.Rd2 Kf6
10.Kf8! Rf1 (10. …Re1 11.Ra2! Re7 12.Rf2 Ke6 13.Re2+-) 11.Ra2 Ke6 12.Ke8 Rb1 13.Ra6 Kd5 14.Kf7 Rf1 (14. …Rb7 15.Kf8+-) 15.Rf6+-]; or [ 4. …Kh8 5.Rh6 Kg7 6.Rh2 with a line similar to what follows].
5. Rg6 Kh7 (Kh8 no different)
6. Rg2 Kh6 (Kh8 no better, nor R?)
7. Rd2 Kg7 (what else?)
8. Kd7 Re1 (what else?)
9. Ra2 Rd1 (Kf7 10.Rf2 Kg7 11.Rf8)
10.Ke8 Re1(Kf6 11.Kf8; Rb1 11.Re2)
11.Rd2 Ra1
12.Re2 Rd1 (Ra8 13.Kd7-Kc6-Kb7+-)
13.Rg2 Kh6 (Kf6 14.Kf8+-)
14.Rg4 Kh5
Here, I am sure I have already covered what happens on 14. …Re1 or 14. ….Rf1 as the white king comes out and is eventually shielded by the rook on the fourth rank. Continuing:
15.Re4 and no matter what black does, the pawn will reach the queening square, and the best black can do is give up his rook for it.
Continued in my very next comment from this point:
Continued immediately from the last comment:
Or at move 3:
3. …..Kf6
4. e7 Kg5
Surely we have seen enough to know how Kg7 will turn out. Continuing:
5. Ra4 Kh5
Here, Kg6 or Kh6 is met by the check from the fourth rank followed by the transfer of the rook to the second rank as before. Continuing:
6. Re4
What has taken me the longest to work out was this exact line. This move looks a bit strange, but it is the right one, I think. The point is that white will queen with check.
6. …..Rg1 (threatening a1Q)
Here, a king move simply allows white to transfer his rook to the second rank and win the way we have seen previously by shielding the d-file at some point allowing the king to come out from in front of the pawn. Continuing:
7. Kd7 a1(Q)
Here, Rd1 is met by Ke6 and an ending much like that below, and Rg7 is met by Ra4, as is Rg8. Continuing:
8. e8(Q)Rg6
Here, Kh6 and Kg5 lose, too: [8. …Kh6 9.Rh4 Kg7 (9. …Kg5 10.Qh5 Kf6 11.Rf4 Kg7 12.Rf7 Kg8 13.Qh8#) 10.Qe7 Kg6 (10. …Kg8 11.Qh7 Kf8 12.Rf4 Qf6 13.Rf6#) 11.Qh7 Kf6 (11. …Kg5 12.Qh5 as earlier) 12.Rf4 Kg5 (12. …Ke5 13.Qf5#) 13.Rf5 Kg4 14.Qg6 Kh4/3 15.Rh5#]; or [8. …Kg5 9.Qg8 Kf5 (9. …Kh5 10.Qf7 and see the rest and what is above) 10.Qe6 Kg5 11.Re5 Kf4 (11. …Kh4 12.Qh6 Kg4 13.Re4 Kg3 14.Qe3 Kg2 15.Rg4 with mate on the next move regardless) 12.Rf5 Kg3 13.Qg6 with mate to follow]. Continuing:
9. Re5 Kh4
Of course, Qe5 is a lost queen vs rook ending, though likely the longest way to resist. Kh6 is mate after Qh8, and Kg4 allows Qxg6 with check.
10.Qh8 Kg3
11.Re3 Kf2
12.Qa1 Ke3
And, though this is a queen vs rook ending, the rook is too far away from his king, and it is white’s move- the rook will be won with a double attack (left as an exercise).
This is too hard.
In my previous two comments, I covered the line that starts with
1. Ra8 Kg7
2. Ra6 Kg6
3. Ke8
And I think I had shown that black loses with all the reasonable third move alternatives through a combination of techniques, but the most important of which was the eventual transfer of the white rook to the second rank and subsequently to the d-file to shield his king from checks from the 1st rank while keeping a2 under observation. To finish this up, I want to look at black’s 2nd move alternatives to capturing at g6:
1. Ra8 Kg7
2. Ra6 Kg8
3. Ra7
The only way forward, in my opinion. Continuing:
3. …..Kg7 (Kh8 below)
4. Ke8
With the tempo white needed. Continuing:
4. …..Kf6
Here, I think Kg6 followed by e7 should eventually transpose into the lines we have seen in my previous comments. I will discuss Kh6, Kg8, and Kh8 later. Continuing:
5. e7
Here, 5.g7 is an illusion: [5.g7? Rg1 6.e7 (6.Ra2 Rg7 with a well known draw) a1Q 7.Ra1 Rg7=]. Continuing:
5. …..Kg7
Again, Kg6 is going to lead to what we saw earlier when black captures at g6 at an earlier move. On Ke6, white can push g7: [5. …Ke6 6.g7! Rg1 7.Kf8 Rf1 8.Kg8 and white will win since the e-pawn queens with check]. Continuing:
6. Kd7! Rd1 (what else?)
7. Kc6! Rc1
On Re1, white queens with the discovered check. On a1Q, white just captures with the rook at a1 and then queens for an easily won Q+P vs R endgame. Continuing:
8. Kd5 Rd1
9. Kc4 and clearly, white will walk the rook down and force one of the lines I mentioned immediately above.
Back at move 4 in the line immediately preceding, black could have played
4. …..Kg8
5. e7 Kh8
Here, Kg7 is the same line as previously after 6.Kd7. Continuing:
6. g7 Kg8
Here, Kg7 is met by Ra3 followed by a check on the third rank and transfer of the white rook to the second rank as we saw in my 2 previous comments. Also, Kh7 is met the same basic way unless the black king subsequently hides at g8, which is like what follows:
7. Ra3 Kh7 (Kg7 same as before)
8. Rg3
The simplest win. Continuing:
8. …..Kg8
9. Rg2
And black is in zugzwang having to move the rook:
9. …..Rb1 (what else?)
10.Ra2 Rd1
Here, of course, Kg7 loses as before: [10. …Kg7 11.Re2 Rd1 12.Rg2 Kh6 (12. …Kf6 13.Kf8+-) 13.Rg8 Kh7 14.Rf8 Rd2 15.Kf7 Rf2 16.Ke6 Re2 17.Kd6 Rd2 18.Kc5 and white walks the rook down on the c and d-files]. Continuing:
11.Rf2 Rd3 (Kg7 12.Rg2 Kh6 13.Rg4)
12.Rf8 Kg7
13.Rf7 Kg8
14.Rf2 Rd1 (Kg7 15.Rg2 Kh6 16.Rg4)
15.Rg2 Kh7
16.Rg4 and we have seen this story more than once in this problem.
All in all, I think 1.Ra8 followed by 2.Ra6 wins in all variations. I hope.
A very difficult problem. Maybe the hardest one I have seen here yet.
Ra8+,Kg7
Ra6!
Ra8+,Kg7
Ra6!
The idea is to have rook on a6, black king on g6. Then Ke8 Re1 e7+ is winning. Therefore Ra8+ Kg7 Ra6.
Ra3
My try : 1 Ra3 Kg7; 2 Ra6! Kg8 ( 2…Kg6 3 Ke8 Kg7; 4 e7 and Ra3, Rg3, Rg2 and Rd2 ) 3 Ra7! Kg7; 4 Ke8 and wins.
Very hard. May be
Ra8+, Kg7
Ra6!, Kg8
Ra7, Kg7
Kg8+ Kxg6
e7
A good study.
White first needs to maneuver the rook so that either Ke8 or the following e7 is played with check: 1. Ra8+ Kg7 2. Ra6 Kxg6 (2. … Kg8 3. Ra7 Kg7 4. Ke8+) 3. Ke8 Kg5 (Black must avoid the f-file, not letting White use the Black king as a shield against Black’s rook) 4. e7.
Now, if Black allows it, White could win by bringing the rook to the 2nd rank and using it to shield against checks down the d- or f-files. For example, 4. … Kh5 5. Ra3 Kg5 6. Rg3+ Kf4 7. Rg2 Kf3 8. Rc2 Kg4 (8. … Kf4 9. Kf8 Rf1 10. Rxa2 Ke5+ 11. Ke8 Rb1 12. Rf2 Ke6 13. Kf8 and White wins the rook for pawn exchange) 9. Rd2 Kg3 10. Kd8 Rb1 11. Rxa2 Rb8 12. Kc7 Re8 13. Kd7 and White wins the exchange.
Black, however, can block the White rook’s immediate access to the 2nd rank: 4. … Kh4 5. Ra5 (pinning the king down and giving room for the White king to make the following maneuvers) Kg4 6. Kf7 Rf1+ 7. Kg6 Re1 8. Ra4+ Kh3 (8. … Kg3 is similar) 9. Kf6 Rf1+ 10. Kg5 Rg1+ 11. Kh5* Re1 12. Ra3+ Kg2 (or Kh2) 13. Rxa2+ Kf3 14. Ra7. Now we’ve entered a more basic endgame. 14. … Re6 15. Kg5 Ke4 16. Rb7 Ke5 17. Rd7 Ke4 18. Rd1 Kf3 19. Rf1+ Ke2 20. Rf7 Ke3 21. Kf5 Re4 22. Kf6 Rf4+ 23. Kg7 Re4 24. Kf8 and White wins.
1.Ra5 Kg7
2.Ra8 Kg6
3.Rg8 Kf5
4.Rg2 Rd1
5.Rf2 Ke5
6.Ra2 Kf5
7.Rf2 Ke5
8.Kf7 Kd6
9.Rd2 Ke5
10.e7 Rf1
11.Ke8 Kf6
12.Kd8
OR
6…Kh7
7.Rg2 Rd2
8.Ra2 Kg7
9.Rg2 Kh7
10.Rg5 Kh6
11.Kf6 Rf1
12.Rf5
Black is lost because white keeps him away from the queening square and protects his own king from checks.
To complete my second line…
12…Rf5
13.Kf5 Kg7
14.Kg5 Kg8
15.Kg6(!)Kf8
16.Kf6 Ke8
17.e7
Not sure this time, but I think white should get the rook to closest right corner somehow, maybe.
You should give us the solution here, since it’s either too hard, but probably another study that comps prove are incorrect.
I’m stumped by this one.
Hmm my first line is flawed. White’s 8th move should be,
8.Kf8, not Kf7
then if
8…Kd6
9.e7 Re7
10.Rd2
Took me awhile to see:
1) Ke8 Kh8
2) Rh7++
Therefore :
1) Ke8 and if not 2) …Kh8 … 2) the black rook is forced to h1 to prevent mate and in so doing loses blacks a2 pawn and allowing whites rook to f2 and the eventual promotion of the e6 pawn.
Now Susan, its been a day now since you posted this exquisite example of mental gymnastics … please relieve this sweet torture …
Oh well, ignore my last solution for it fails to ++ with 2) Rh7 …
D’oh! What was I thinking! Obviously the anticipation of a solution is clouding my mind….
C’mon Susan, put me out of my misery!!!
I think white should move R down on a file and force black to take g pawn by playing g7.Then give a check on g file to drive black king to h file and move R to g2 so that you can capture at a2 when black moves rook without check.Then move rook to e2 and in the shadow of rook move king to e7.By this time black king could come to f6 and if black tries now Re1 first drive away black king by Rf2 and then capture at a2. I can not give any variation but I hope plan is correct.
This one is haunting me.
My first line 8th move was right.
8.Kf7 Kd6
9.Rd2 and
9….Kc7
10.e7 Rf2
11.Ke8 Re1
12.Rc2 Kd6
13.Kd8 Rd7
14.Rd2
The suggested lines with 1.Ra8 are well examined and do appear to lead to the win, but I don’t see how white is prevented from winning more easily with 1.Ra5. With this move he transfers his rook to the second with gain of time to keep the black pawn covered while at the time initiating the plan of keeping the black king away from the queening square while protecting his own king from checks. This I think is the “important structure” to which Susan is referring. There doesn’t seem to be any need for white’s extra pawn.
Jorge,
Like I wrote in one of my comments, I am not sure that there aren’t other winning rook moves that transpose to the same line after white plays Ra6 with the king on g7, but your suggestion seems like a clear draw to me:
1. Ra5 Kg7
2. Ra8 Kg6
3. Rg8 Kf5
4. Rg2
And, of course, move like Re1 for black here will lose instantly to 5.Rf2+ followed by 6.Ra2. However, your suggestion of Rd1 at this juncture just doesn’t seem to be improvement for black. I would suggest a move like
4. …..Kf4
There are other moves I might suggest for black. Of the rook moves, Rb1 should draw due to the check from b7 in which the white king won’t be able to hide on the side of his pawn at f6 due to black’s king, and won’t be able to to attack the rook from d6 and will just be checked again from b6. Of course, on 4. …Rc1, the check from c7 is immediately defeated by Kd6 attacking the rook. From the other side, 4. …Rh1 seems to lose to me since Rh7+ is defeated by Kd6 hiding on the pawn’s side. Other king moves like Ke4 or Ke5 probably are similar to what follows:
5. Kf7
I find nothing that wins for white, but I will show the line where white tries to use the black king as a shield:
5. …..Kf3 (likely only move??)
6. Rc2
Here, of course, e7 is met by Kg2 followed in turn by Rf1+ and a1Q. Also, 6.Rd2 is met by Ke3 followed by Rf1+ or Kxd2 (if white tries e7). Continuing:
6. …..Ke3
With the threat of Rf1 followed by a1Q. I simply don’t see how white can make any progress- he can no longer use the rook at d2 or f2 as a shield because the black king has taken those squares away, and always has the threat of a rook check followed by a1Q.
This problem is why we need 7-men tablebases. C’mon the storage is available now, what’s the holdup?
Yancey,
Thanks for the reply. Next time I will go with the consensus and double and triple check!